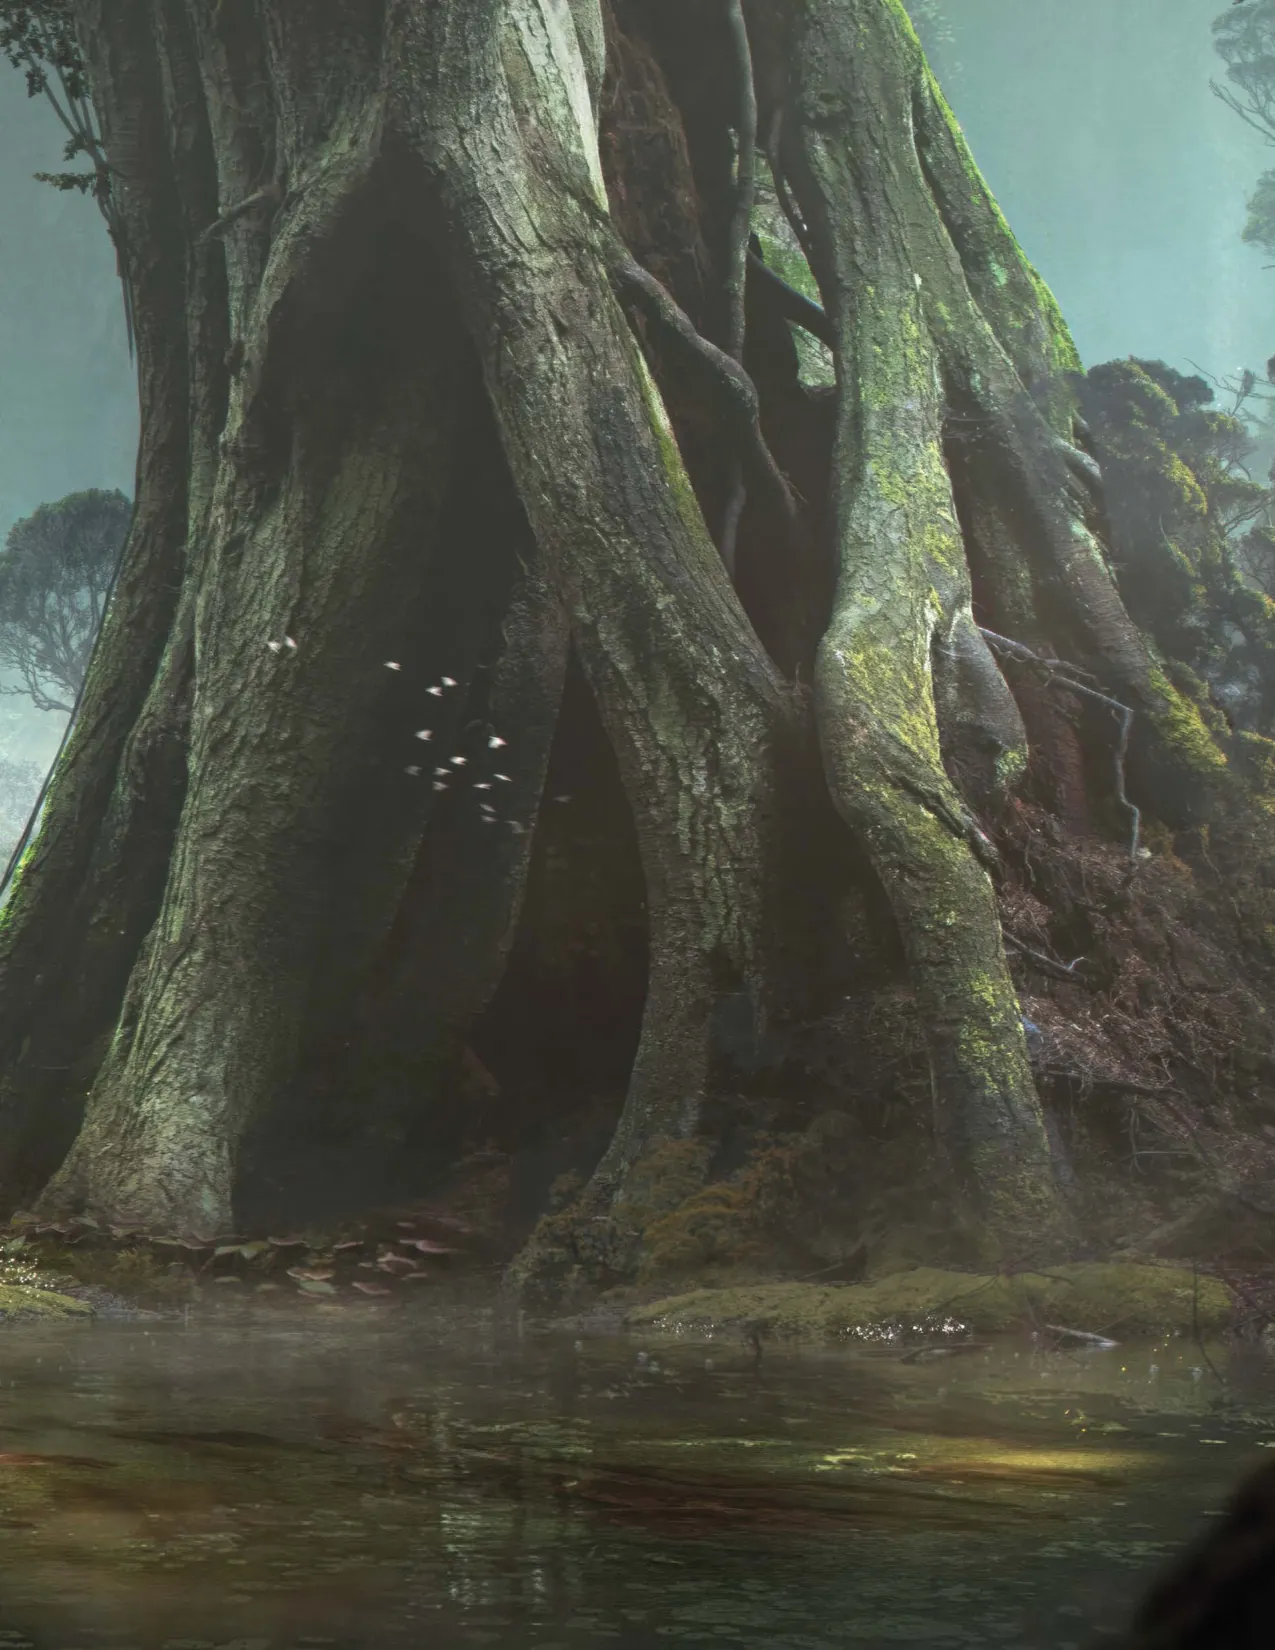
Shrouded in the shadowed heart of the Oldwoods, the Mossy Temple waits. No mortal tongue remembers the temple’s true name, but the Druids of the Oldwoods whisper that it is the oldest structure in all the Heartlands—older than Mytros, older than the Dragonlords, older even than the gods.
Built in an age before memory, when the Titans ruled unchecked and the cyclopean gygans raised shrines to Sydon, none who enter its vine-wrapped gates have ever returned. To step into the Mossy Temple is to trespass upon the bones of a dead empire.
The History of the Temple#
The temple’s true name is lost to history. It was built thousands of years ago by an ancient species of six-armed cyclopes called the gygans. It honors Sydon, and it harkens to a time long before the mortal species arrived in Thylea. During this period, the gygans were devout servants of the Titans. They propitiated Sydon with great sacrifices, earned his favor, and their empire spanned all the islands of Thylea. The gygans are thought to have been exterminated by Pythor and the Dragonlords by the end of the First War.
Demetria, the Vengeful Dryad#
Recently, teenagers have been disappearing from the towns and farms around Estoria. They are lured into the forest by roving bands of goatlings that serve the mistress of the temple, a dryad named Demetria.
Demetria has good cause to hate the people of Mytros and Estoria. Centuries ago, the Dragonlord Estor Arkelander chopped down her sister’s oak tree to use as the mast for his ship, the Ultros. Demetria went mad with grief for her sister and swore fealty to Lutheria, who embraced her and further stoked her rage.
Demetria loathes mortals. She captures young men and women to serve in Lutheria’s dark rituals, telling them that they are being initiated into an ancient priesthood. In actuality, the women are transformed into monstrous
- maenads (appendix B), while the men are slaughtered and devoured in ritual feasts. In the past year, Demetria has become more brazen.
She has captured dozens of teenagers now. Recently, she sent her goatlings to steal the Horn of Balmytria (appendix C) in order to feed her growing number of servants.
Quest: The Horn of Balmytria#
The Oldwoods#
The Oldwoods is an ancient forest that lies in the center of the Heartlands, surrounded on all sides by fields and farms. It is a forest consisting mostly of ancient oak and walnut trees. For the first century of the Golden Age, the new settlers to Thylea cut down trees to build their farms, towns and cities. But they stopped when they reached the Oldwoods because fey creatures are known to haunt the forest. In the modern daytimes, no one enters the Oldwoods except for the Druids. Traveling to the edge of the Oldwoods only takes a few hours, but traveling within the forest to the Mossy Temple takes the better part of a day. Tracking the goatlings requires a successful DC 10 Wisdom (Survival) check.
Kyrah’s Quest#
When the heroes cross the threshold into the Oldwoods, Kyrah will speak up. Read the following:
Kyrah will not press the matter if the heroes don’t show interest in helping her in this manner. If the heroes do take an interest, she suggests that they go after the thieves once they have retrieved the Horn of Balmytria (appendix C).
When the heroes decide to go after the instruments, Kyrah will take the heroes to the Helios Shrine and then the Tower of Adonis. These locations are detailed in the Heartlands section of chapter 2.
If the heroes recover nymph’s hair during one of these quests, Kyrah will suggest the following:
Encounter: Tribe of Goatlings#
Following the trail of the goatlings, the heroes eventually come to a shadowy clearing in the woods.
The six Goatlings (appendix B) attack the heroes before they can respond. As they use Mockery, you can roleplay the taunts that they hurl at the heroes:
“Get lost, you pathetic starvelings!”
“Your face inspires me … to vomit!”
“You are a plague-sore on the ass of a pig!”
“Bald legs! Bald legs! Bald legs!”
“Fish-faced assassins of joy!”
Quest: Corinna’s Friends#
Corinna (NG Scout) is the daughter of Thericles, who works the vineyards in Estoria (area E13). She and her friends were lured into the temple by a beautiful woman named Demetria, who promised wealth, beauty, and fame.
Corinna was warned to leave the temple by a young satyr named Loreus, who said that she and her friends would soon be doomed to a fate worse than death. She fled the temple, but the goatlings pursued her.
If the party asks about the Horn of Balmytria, Corinna confirms that the horn is in the temple. She warns the party that Demetria is unspeakably beautiful, and has a way with words that makes everyone fall in love with her. Nevertheless, she wants to save her friends, so she is determined to accompany the heroes into the temple.
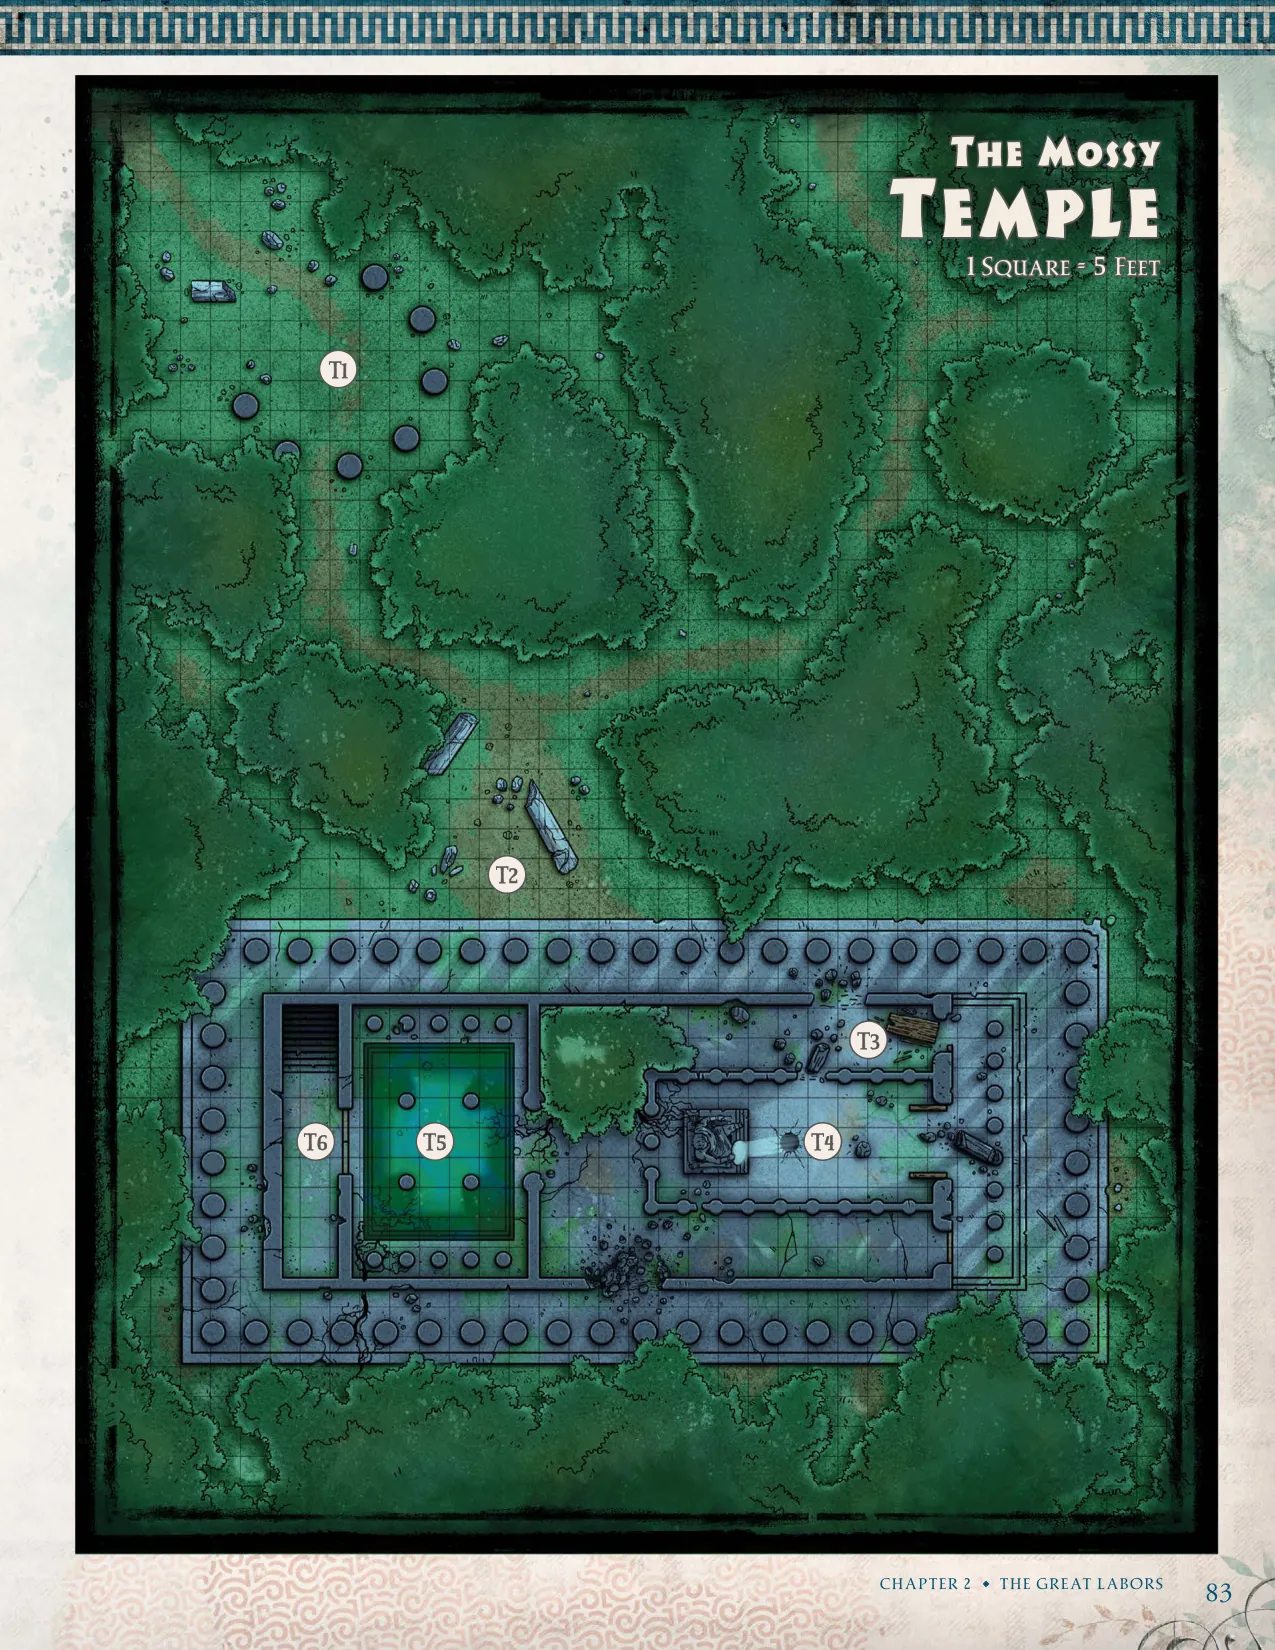
Mossy Temple Exterior#
T1: The Standing Stones#
These standing stones were erected by the druids of the Oldwoods more than a thousand years ago. If a Druid or Ranger finishes a Short Rest while within 10 feet of the standing stones, it will count as a Long Rest instead. This only works once per 24-hour period.
Herkus the gnome (CG Druid) hides near the standing stones in the form of a squirrel. Herkus is completely insane. As a squirrel, he chatters at the heroes madly. He jumps from stone to stone and then throws nuts at them. He will jump on them and try to bite them. He will only transform back into a gnome if he is captured or damaged.
Curing Herkus. If Herkus is ever cured of his insanity with a Greater Restoration spell, he will thank the heroes profusely. With his mind returned to him, Herkus turns out to be a very talkative gnome. He is one of the Druids of the Oldwoods. Demetria poisoned him with a tea made from a flower that grows in the ancient glade.
T2: The Temple Entrance#
There are a few ways into the inner chambers of the temple. No one guards the location, but the roots of the ancient oaks can be animated by Demetria. She can use a Bonus Action to cause one of the roots to attack any creature within reach. The roots can discern species, so Demetria can allow certain folk, such as satyrs and goatlings, to come and go as they please.
Animated Roots. Each root has an AC of 10 and 10 HP. Each root can make one attack per round: +3, reach 10 ft. Hit: 2 (1d4) Bludgeoning damage. If the target is Medium or smaller, it has the Grappled condition (escape DC 10) and is Restrained until the grapple ends. The roots have a Passive Perception of 14.
Mossy Temple Inner Chambers#
T3: Ruined Antechamber#
The upper floor of the temple consists of four rooms: the antechamber, the main worship chamber, the baths, and a flight of stairs leading into the underground chambers.
Broken Shield. There is a broken bronze Shield on the floor that appears to be centuries old. It bears the symbol of the Dragonlords and has scenes of a dragon-mounted warrior subjugating a species of six-armed cyclopes inscribed on its edge. The Dragonlord can be identified as Estor Arkelander with a successful DC 15 Intelligence (History) check.
T4: The Chamber of Sydon#
This central chamber is quiet. There are no animal sounds and the statue seems to stare at the heroes. If Herkus is present in squirrel form, he shrieks and throws a nut at the statue’s head.
Small Shaft. The mirror reflects light into a small hole in the floor. A Small creature can crawl down the shaft, which leads to another mirror and then goes straight down into the Ancient Glade (area T8). Someone can drop down 20 feet into the chamber, but they must succeed on a DC 10 Dexterity saving throw or they take 7 (2d6) Bludgeoning damage. The Statue and Mirror. The statue is made of marble around a core of adamantine with an AC of 18, 100 HP, and a damage threshold of 5. The mirror is polished adamantine with an AC of 23, 30 HP, and a damage threshold of 5. Attacking either object will make a loud echoing noise. Attacking twice will alert the entire complex to the heroes’ presence.
T5: The Ancient Baths#
This room is part of an ancient bath complex. There are public baths in the city of Mytros, but this one is far older. The fountains would normally be running at all times, refreshing the water in the pool, but these probably haven’t worked for centuries.
Stagnant Oozes. The pool water is the domain of two
- Gray Oozes. They remain motionless and invisible at the bottom of the pool and only attack someone who enters the water. Animated Roots. Demetria has ordered the roots here
to attack anyone except goatlings, satyrs, and maenads. Two roots will attempt to grab and restrain the heroes, then drag and hold them under the water. Refer to the rules on holding your breath and drowning. Because the roots are beneath murky water, attacks against them have Disadvantage. Any creature dragged underwater will also be attacked by the gray oozes.
T6: The Descending Stairway#
Two of the statues are merely inanimate and will collapse into dust when touched. The other two statues retain the magic that animated them as guardians centuries ago. The statues have the statistics of Gargoyles with no Fly Speed. They awaken and attack when an intruder starts to descend the stairway. However, should someone place an offering in the bowl held by one of the statues and say a short prayer to Sydon, the statues will remain inanimate.
Suspicious Footprints. The stairs are marked by dozens of hoofprints and human footprints, some of which track through haphazard splashes of red wine.
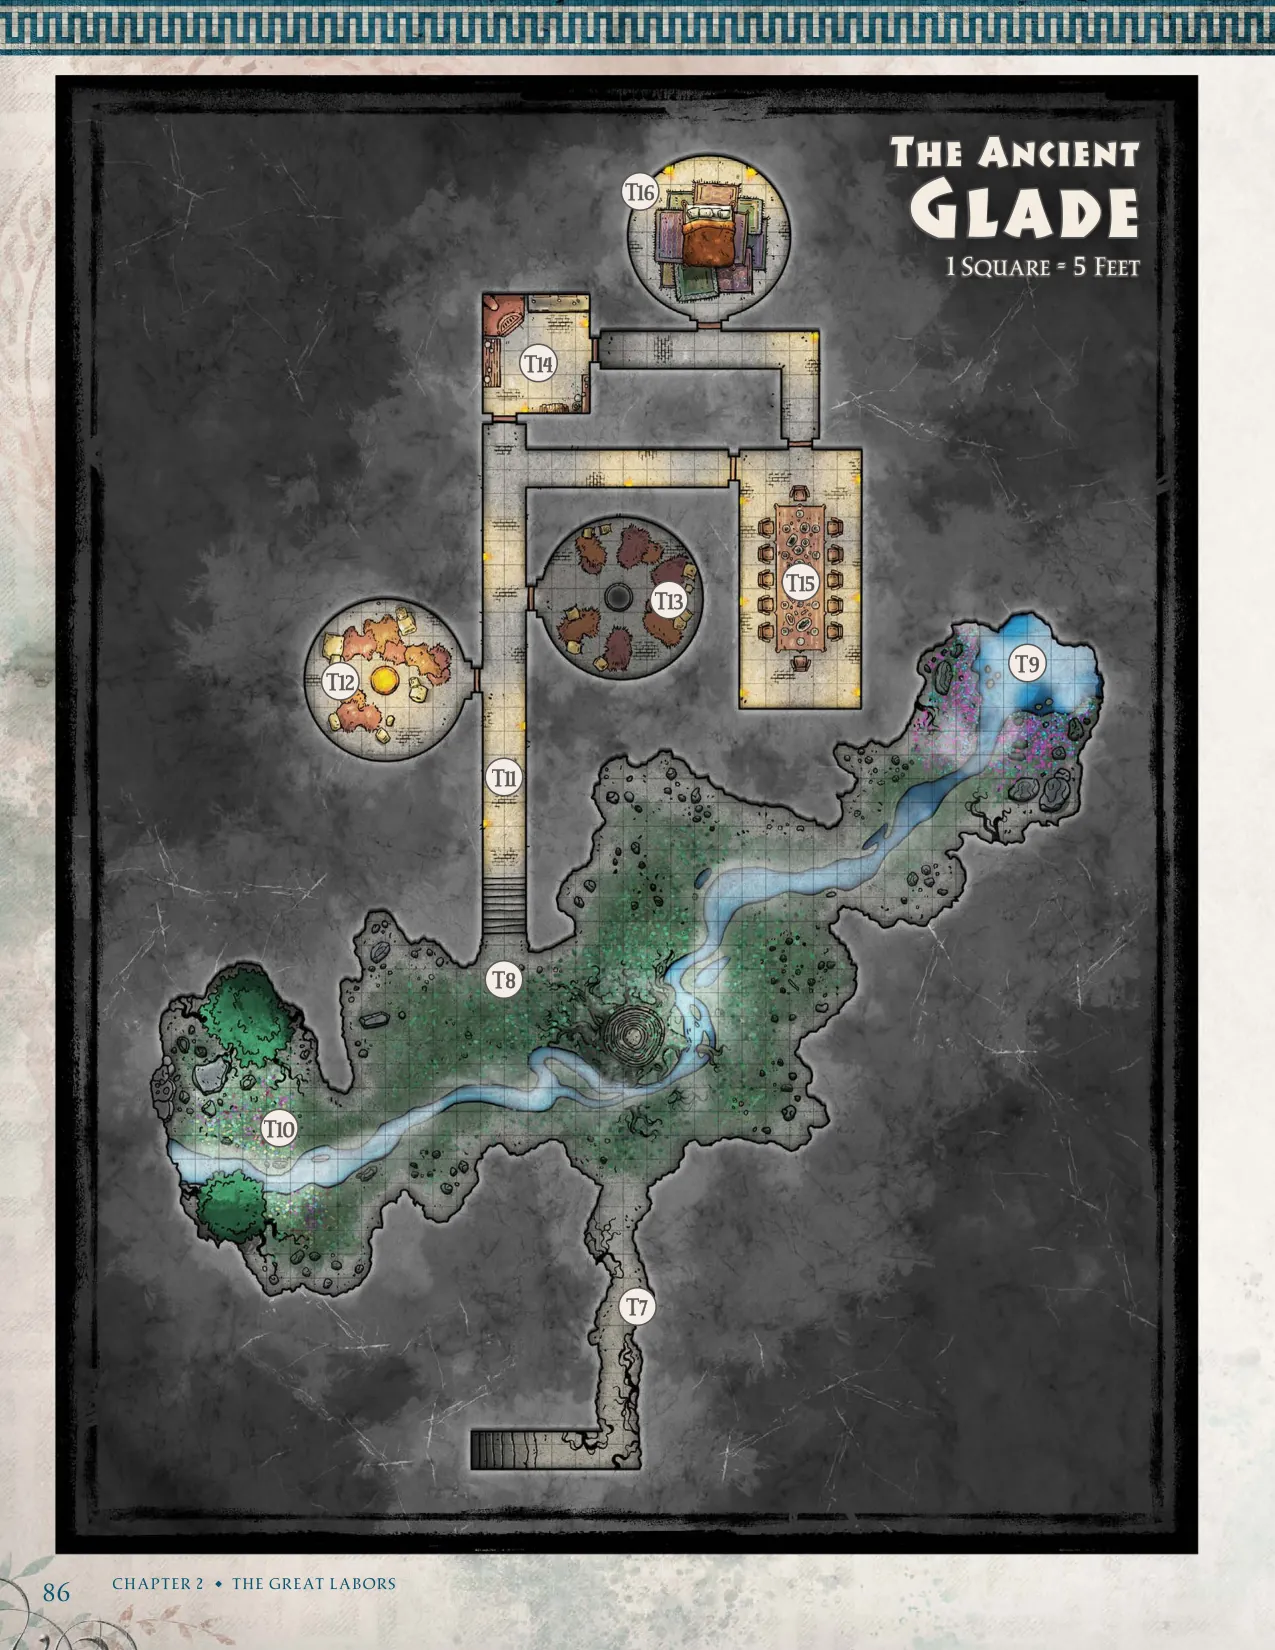
The Ancient Glade#
The ancient glade was a natural cavern that the gygans built over. The gygans’ mirror system lets light into the cavern and allows the rare plants to grow. The natural cavern has a ceiling that is 20 ft. in height, while the worked stone tunnels and chambers are 10 ft. in height.
T7: Tunnel of Roots#
The roots do nothing when they are first encountered. However, if Demetria attempts to flee through the tunnel, she can use these roots to restrain the heroes.
T8: The Ancient Glade#
This cavern is used as a place to grow rare plants of various kinds. It is moist and fed by a small underground stream. The mirror system reflects light down a small shaft into the underground glade. This is how the rare plants get sunlight.
Encounter: Sostrate. Two Goatlings (appendix B) chase a young man around the glade. He shrieks when they grab at him, but they always release him so that they can resume the chase.
Four other Goatlings are currently hidden and watching from the shadows. The boy, Sostrate (NG Commoner), is one of Corinna’s friends. If the heroes do not intervene, the ‘game’ will eventually end in his death.
If the goatlings see the heroes, they will first try to finish off Sostrate and then attack them. Roll Initiative and make the intent of the goatlings clear. Any goatling who is damaged before his first round will shift his target to the heroes. If Herkus is on a hero’s shoulder, he will throw a nut and draw the ire of one of the goatlings. If Corinna is present, she will rush forward to save Sostrate. The four goatlings hidden in shadows will attack anyone who moves in to save Sostrate.
Treasure. Sostrate wears an Amulet (Lunula Talisman) (appendix C). If the heroes rescue him, he will give it to them as a reward.
The Ancient Tree Stump. The cavern is dominated by the stump of an ancient tree.
This was a sacred tree to the fey of the Oldwoods, but the Dragonlord Estor led a band deep into the forest and chopped it down. He carved the tree up and used it for the mast, keel, and prow of the Ultros.
Demetria’s Sister. This was once the sacred tree of Demetria’s sister, another dryad. Demetria keeps a small clay pot with her sister’s ashes resting on the top of the stump. If opened, the ashes smell of roses. If Demetria discovers that anyone has touched the ashes, she will be determined to kill that individual.
Garden of Strange Plants. There are also several rare and useful plants here:
Ethereum Plant. This can be harvested in order to create the poison, Essence of Ether. It takes an hour to harvest enough of the plant to make a single dose. There are enough plants in the chamber for 12 doses. Proficiency with the Poisoner’s Kit is required.
Aconite. This can be harvested in order to make the poison, Assassin’s Blood. It takes two hours to harvest enough of the plant to make a single dose. There are enough aconite plants in the chamber for 12 doses. Proficiency with the Poisoner’s Kit is required.
Sunril Berry Bush. The berries from this legendary bush have the same effect as Goodberries. Thirty berries can be harvested from the bush. The berries are easy to harvest, but they will spoil in 24 hours.
T9: Cavern of Fungus#
This cavern is filled with the Madon fungus which doesn’t require sunlight to grow. The Madon is famed for its use in the making of the Truth Serum poison. It is also used as a recreational drug. When eaten, it causes a state of euphoria that lasts for hours.
Goatlings. A pair of Goatlings (appendix B) hide at the back of the cave. They attack the heroes as soon as they see them.
Teenage Revelers. There are currently eight teenage men and women in the cavern chamber. They have all been eating the Madon fungus and are in a euphoric state: they are considered to have the Poisoned condition for the next two hours. All of them are under the sway of Demetria and are awaiting their turn to be ‘initiated’.
The teenagers cannot be convinced that Demetria is anything other than a benevolent goddess who has promised her devoted followers wealth, beauty, and fame. If separated from Demetria for 24 hours, they can be persuaded of the nymph’s true intent with a successful DC 10 Charisma (Persuasion) check. The teenagers have the stats of Commoners and are divided into pairs: Lysandra and Bassilus, Kleon and Heron, Irene and Draco, Callisto and Ariston.
Grasping Roots. There are two roots close to the entrance to the cave. These roots will attempt to grapple anyone trying to leave the cave.
Making Truth Serum. Heroes with proficiency in Nature will recognize the Madon fungus and realize its usefulness in making the Truth Serum poison (Game Master’s
Guide). Proficiency in Medicine is required to recognize that the fungus needs to be harvested in a particular way to avoid spoiling its effectiveness. Every hour spent harvesting the fungus gives enough material to make a single dose of Truth Serum poison. There is enough harvestable fungus for 12 doses.
T10: Den of Lush Flowers#
This cavern is the resting place for some of the fey who have come to visit Demetria. There are two Satyrs and one Dryad, who have come to plead with her to stop antagonizing the mortals. Harmless pranks are one thing, but kidnapping young mortals is dangerous. They worry about a reprisal from Estoria.
Fey Diplomacy. The satyrs and dryad won’t harm the heroes, but they won’t help them either. They will simply inform the heroes that Demetria rules the temple, that her actions are her own, and that she doesn’t represent the other fey of the forest. They would be pleased if Demetria were no longer a problem in the Oldwoods.
Encounter: Loreus the Satyr. Loreus (CG Satyr, appendix A) is also here, and he is very interested in the heroes. He is quite talkative, and he asks many questions about their purpose in the temple. Loreus is different from most of his kind and has an intense curiosity about the settler species.
Demetria’s History. Loreus explains that Demetria was consumed with a desire for revenge after her sister was killed by Estor Arkelander five hundred years ago. She sought out Lutheria and formed a dark pact with the Titan, vowing to cast a shadow over the Oldwoods and to make the mortal species remember their fear of the dark.
Lovestruck Satyr. Loreus is driven by his emotions, both good and bad. If one of the heroes shows him even an ounce of kindness, he will fall in love with them. Loreus will stealthily follow his new love when they leave the cave. While Loreus doesn’t know details of the maenad initiation feast, he suspects foul play and urges the heroes to investigate the kitchens.
T11: Stone Corridor#
This corridor is usually empty. It is lit by two Everburning Torches (appendix C).
T12: Nursing Chamber#
There are two Maenads (appendix B) present in this chamber with their goatling children. The maenads are drinking wine, eating mushrooms, and feeding their children the same. When the maenads spot the heroes, they demand to know who they are, while the goatlings will growl and hiss. If the heroes can come up with a convincing lie, a successful DC 15 Charisma (Deception) check will put the maenads back at ease. In this case, they invite the party to enjoy their wine and mushrooms.
Frenzied Maenads. If the heroes don’t immediately provide a satisfactory lie, then the maenads will enter a frenzy of drunken bloodlust and attack.
Baby Goatlings. The four young goatlings (10 AC, 1 HP) carry small knives for cutting mushrooms. They threaten the heroes with their knives, but they are too timid to attack.
T13: The Sleeping Chamber#
There are four teenagers sleeping in this chamber. Their names are Nikon, Markos, Theophania, and Phokas. They have the stats of Commoners and behave in the same way as the teenagers from the Cavern of Fungus (area T9), although they don’t have the Poisoned condition.
Grasping Roots. There are two roots close to the entrance to the cave which attempt to grapple anyone who tries to leave the room without Demetria’s permission. As with other roots, they do nothing to those who are entering the chamber.
The Feasting Halls#
The feasting halls are chambers of worked stone built by the gygans more than a millennium ago. The ceilings are 15 ft. in height, and the walls are cyclopean stonework.
T14: Kitchens#
This is where the food is prepared. Currently the slaughtered carcasses of four teenage boys are being prepared for the meal in the Feast Hall (area T15). The cooks are two
- Goatlings (appendix B). They will continue with their task unless attacked by the heroes. The horrific nature of the feast is revealed with a successful DC 15 Intelligence (Investigation) check.
T15: Feast Hall#
This is a feasting chamber with a giant table, beautifully laid out with wine and food. Reflected light pours in from the mirrors. Demetria (CE Dryad) is here with four adoring teenage girls as they prepare for the initiation feast.
Loyal Gygan. Demetria’s Gygan (appendix B) servant is nine feet tall, and he looms in the background. He has a single eye, six powerful arms, and a number of weapons and shields. He’s also very clever, although he doesn’t speak much. Sydon has charged him with both protecting and watching over Demetria.
The Dryad’s Appeal. The dryad invites the heroes to sit and join the feast, but makes it clear they are not under the protection of Guest-Friendship (appendix D), as they are intruders in her domain. She is granting her best student a special prize, a Shortbow of Cupidity (appendix C), and playfully accuses the heroes of spoiling a special moment.
As long as the heroes don’t initiate combat, Demetria is happy to talk. She knows that the heroes have been chosen by the Oracle, but she dismisses their quest as an impossible one. She extols Sydon’s strength and Lutheria’s beauty. She speaks of the cruelty of the Dragonlords, explaining that her sister lost her life to the wickedness of Estor Arkelander. She asks the heroes whether they are truly fighting for the right side in the looming conflict. She then invites them to share the meal with her and the girls.
A Grisly Feast. The feast consists of the cooked bodies of the young men who were paired with the girls at the table. If the heroes are aware of this, then they can convince the girls with a successful DC 15 Persuasion check (automatically succeeding if Corinna is with them). If Herkus is with the heroes, he will transform into his gnome form, sniff the air, and declare that the meat smells like cooked human flesh.
The Ritual is Completed. Eating the human flesh has no ill effects on any of the heroes, but if they cannot dissuade the girls from partaking in the feast, then Demetria’s ritual is completed, and the girls are transformed into four Maenads (appendix B):
At this point, Demetria orders everyone to attack the heroes and feast on their flesh.
The Ritual is Disrupted. Revealing the true nature of the meal to the girls will infuriate them so that they attack Demetria, restraining her for three rounds. The gygan will easily kill the girls unless the heroes intervene. If the heroes attack Demetria before the ritual is completed, the girls scream and hide, while the gygan defends Demetria. They fight to the death.
Treasure. Demetria carries a Shortbow of Cupidity (appendix C). The Horn of Balmytria (appendix C) occupies the center of the table.
T16: Demetria’s Chambers#
Demetria spends most of her time in these chambers, enjoying the company of love-besotted teenagers. She lures them here before using them in her evil rituals.
Treasure. There are two Everburning Torches (appendix C) mounted on the back wall. Demetria keeps her valuables locked in a trunk. The lock can be opened with a successful DC 15 Dexterity (Sleight of Hand) check with Thieves’ Tools. Inside are trinkets and other items stolen from the teenagers she has kidnapped. This haul includes two necklaces worth 100 GP each. There are also four rings worth 50 GP each and a half dozen gems of different sorts each worth 50 GP.
Ritual Tome. The most important item is a tome bound in human skin. Inside is a description written by Lutheria herself on the ritual of transformation that turns a human woman into a maenad.
The Horn of Balmytria#
Once the heroes have secured the Horn of Balmytria (appendix C), they are expected to drink from it. They may choose to do this as soon as they recover it, or they may wait. Drinking even a small amount of wine from the horn for the first time sends the heroes into a deep sleep for 8 hours. The heroes experience vivid dreams during this sleep:
Kyrah can interpret this dream, as can Aesop at the Dragon Shrine (area E7) in Estoria, or Proteus at the Temple of the Oracle. They know that you have seen the Ultros.
The Ghost Ship#
There is only one ghost ship known to the people of Thylea, the Ultros. This is the famous trireme constructed by the Dragonlords, five centuries ago. It was commanded by a bloodthirsty man, Estor Arkelander, who was responsible for starting the First War. He was later cursed to sail the seas forever as a ghost. The only person who is likely to know the location of the Ultros is King Acastus of Mytros, for he is a descendant of Estor Arkelander.
The Strange Device#
The bronze construct from the dream may be the legendary magical compass known as the Antikythera (appendix C, Odyssey of the Dragonlords). Supposedly, it has the power to navigate to all of the islands in the Cerulean Sea, the Forgotten Sea, and even the legendary Nether Sea. It’s uncertain where this item might be found, but it’s useless without the ship.