Beneath the towering peaks of the Mithral Mountains lies a place of legend and fire—a forge born of divine purpose. In the days of the First War, dwarf smiths toiled beside rivers of flame, shaping weapons for mortals and gods.
But glory gave way to ruin. The forge now stands silent, its anvil cold. Troglodytes crawl like vermin through the upper halls, defiling what remains of dwarven craft. In the depths below, something far worse waits—an ancient terror birthed by the Fates and unleashed by Lutheria to extinguish the forge’s divine spark. It succeeded. The dwarves are gone. Their legacy lies buried beneath blood and stone.
Yet the forge endures.
The History of the Forge#
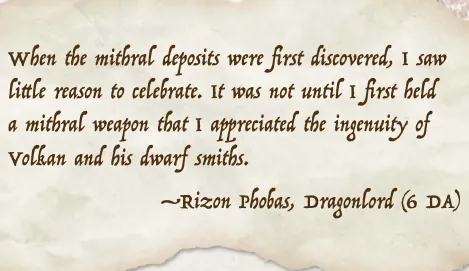
The Mithral Forge was a key component of the victory of the Dragonlords over the armies of the Titans. The dwarves that came across the seas with the Dragonlords discovered this deposit of mithral and adamantine in the central mountain range of the new continent. For more than a decade, these metals were mined and used to forge weapons, armor, and magical artifacts for the mortal armies.
The Titan, Lutheria, decided that something had to be done about the mine. She formed a pact with the Fates, who used their magic to breed a terrifying cerberus hound, which Lutheria unleashed to destroy the forge and slaughter the dwarves.
After driving out his foes, the cerberus hound made a lair in the mines and began to spawn hundreds of death dogs. The Dragonlords tried to retake the forge, but they were repeatedly driven back until they were forced to abandon it entirely.
For several centuries the hound watched over the ruined forge. However, a decade ago, some primordial thing from the depths of the Underdark emerged and killed it. The death dogs remained in the mine but, without anything to direct them, they retreated into the lower depths. Several tribes of troglodytes crept into the upper levels soon afterwards.
Traveling to the Forge#
The Arkelon River flows from the Mithral Mountains and cascades over the Great Falls of Arkelon, before continuing through the Heartlands to empty into the Cerulean Gulf. Setting out from the North Gate of Estoria at dawn, the heroes may follow an abandoned road through the steppes to reach these falls by dusk.
The Abandoned Road#
This road was once used to ferry metal goods and ore from the mines, until it was abandoned centuries ago. The steppes are quiet and the trip is uneventful. At sunset, the heroes encounter a band of centaurs.
Encounter: Band of Centaurs#
Twelve Centaur Troopers will surround the heroes. If the centaurs are attacked, they will fight only to subdue, not to kill.
The chief of the centaurs is named Hukar. He warns the heroes that, if they are heading to the Great Falls, then they should beware. Troglodytes dwell in the caves there, emerging at night to hunt for food. He thinks that two of his kin fell into the clutches of the foul creatures. There is nothing he can do for them, as the paths and tunnels of the mines are too treacherous for his kind.
Quest: The Missing Centaurs. If the heroes agree to search for Hukar’s kin, then he gives them an ivory horn. He tells them to blow the horn on the riverbank of the Arkelon when they have discovered the fate of his kin, and he offers a reward.
Rewards. If the heroes discover the fate of the missing centaurs, they may do as Hukar instructed. The horn will summon the centaurs to the riverbank. They will mourn their dead and invite the party to drink under the stars with them, offering Guest-Friendship. True to his word, Hukar will give the heroes three Potions of Heroism as a reward.
Blood of Sydon. Hukar explains that the potions are concocted from the blood of his tribe, who are blessed by the Lord of Storms, the Ocean Father—Sydon. He knows that the heroes are prophesied to confront the Titans, but he encourages them to consider Sydon’s great wisdom. Hukar claims this world only exists because of their god, and it would be worse off without him.
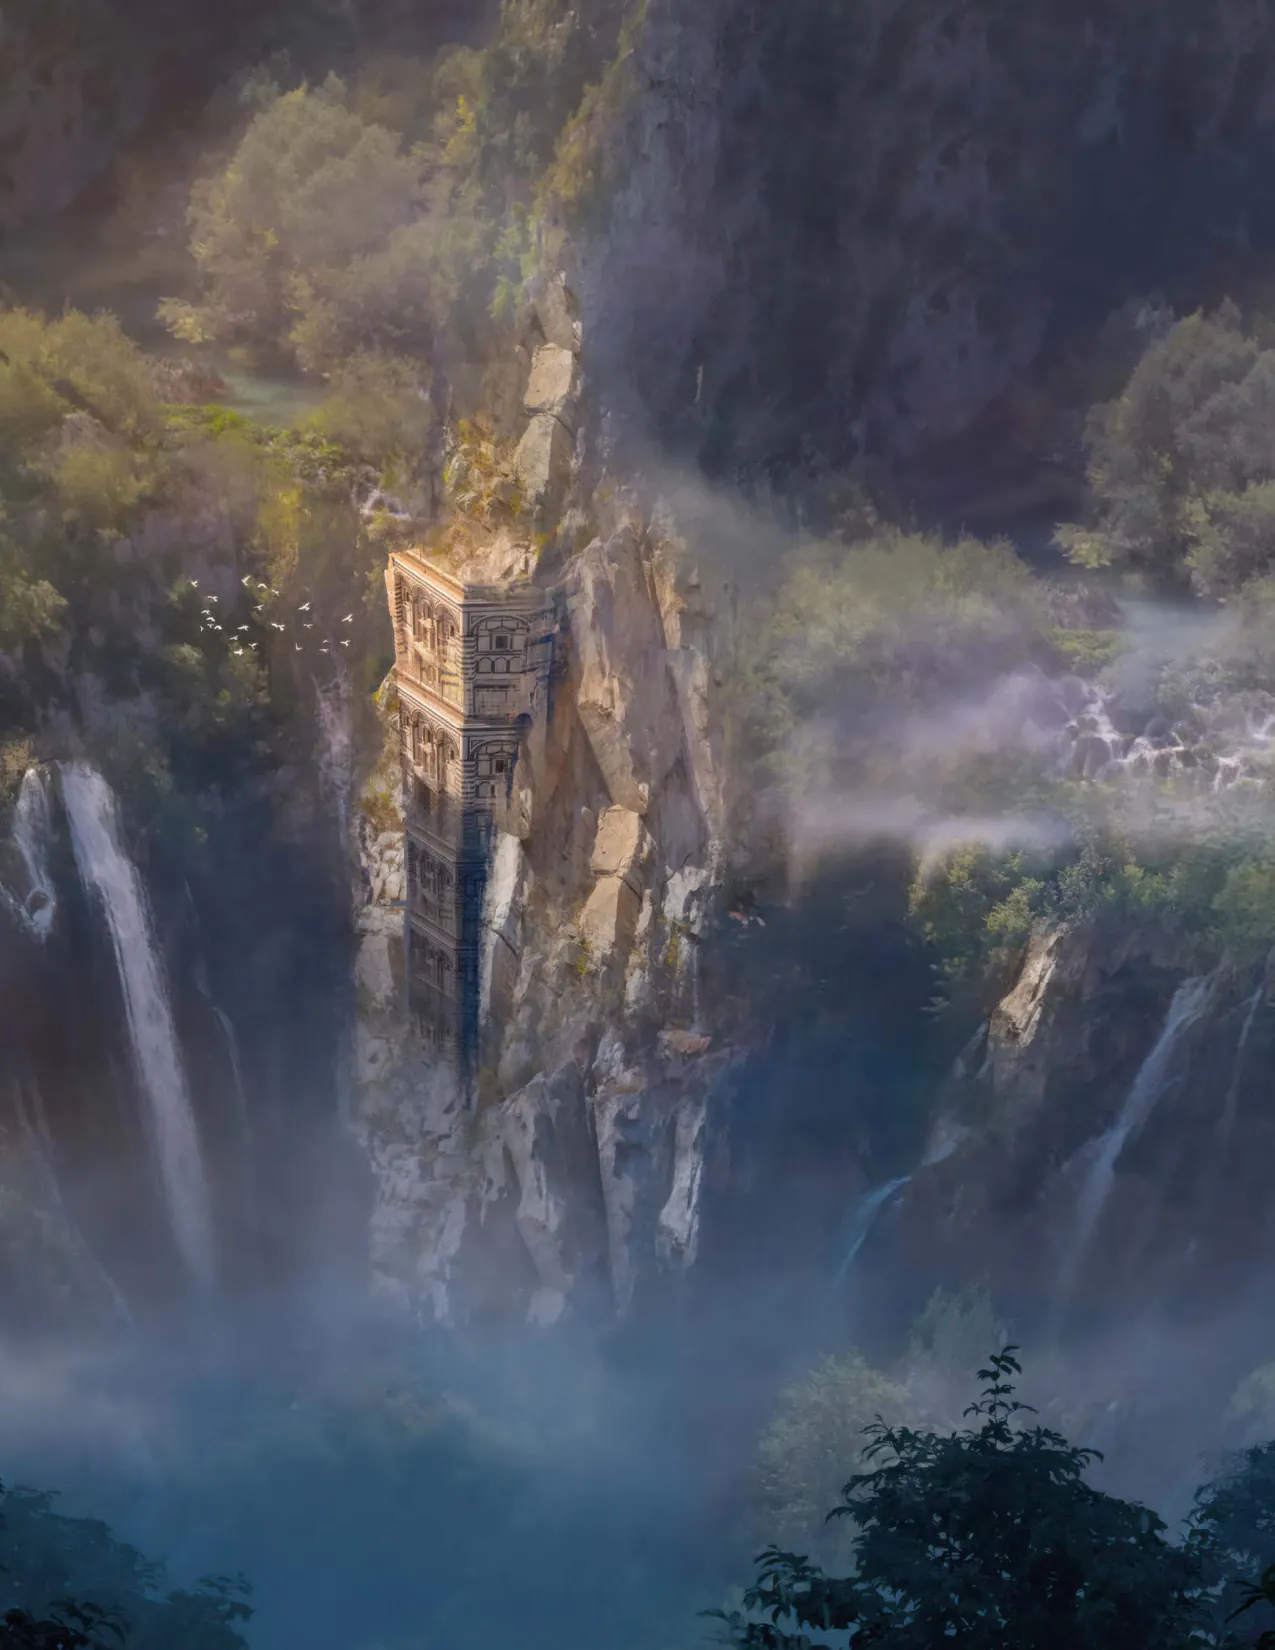
The Great Falls of Arkelon#
A wooded path descends down to the misty riverbank, where the collapsed entrance to the mines can be seen. A secret pathway into the mines can be found here with a trivial investigation. The lake is flanked by four massive statues of hands, two per side. These are the Hands of
- Kentimane (appendix B, Odyssey of the Dragonlords), the Elder Titan, but they are dormant for now.
Collapsed Entrance#
The main entrance to the mines is blocked by tons of rubble and is completely inaccessible. This was done by the dwarves when they fled from the cerberus hound, as they hoped to keep the beast sealed away.
F1: Secret Pathway#
This path leads under the waterfall. Anyone walking along it is sprayed with water from the falls. Wet moss covers the sides, though the path itself is well used and relatively safe. This is the main path used by troglodytes to go hunting at night. There is a rope ladder that leads down to the river below that troglodytes use when they go fishing. This pathway was carved into the cliffside centuries ago when the dwarves were first exploring the natural caves behind the waterfall.
Encounter: Troglodyte Foragers. Read the following when the heroes are halfway down the pathway:
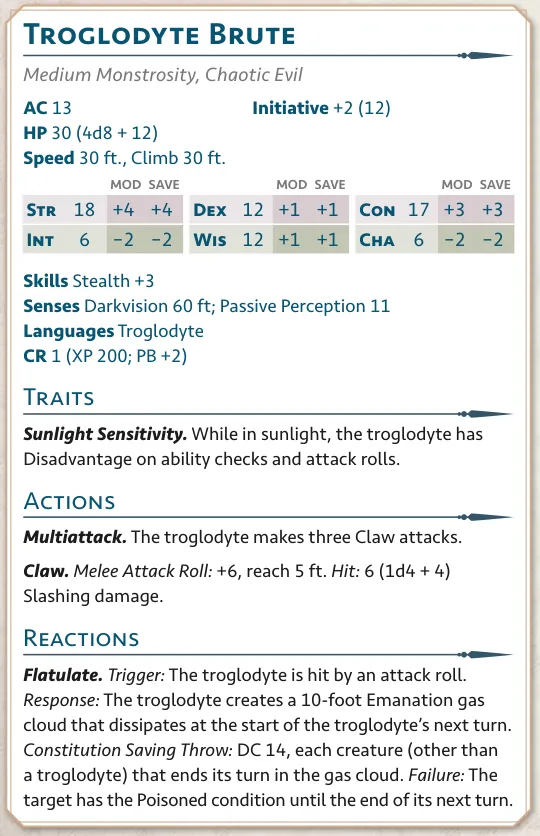
These troglodytes are part of a daily expedition sent to fish the river further down from the falls. There are three Troglodytes and one Troglodyte Brute (see accompanying stat block). They attack the heroes as soon as they spot them.
F2: Forked Tunnel#
This corridor is heavily used. Every time the heroes travel through the tunnel, there is a 1 in 6 chance that they encounter a band of (2d4 + 2) Troglodytes led by a Troglodyte Brute (see accompanying stat block). One troglodyte will run back to the warrens to raise the alarm, while the other troglodytes fight to the death.
Troglodyte Caves#
The troglodyte caves are inhabited by dozens of the vile creatures, including broodmothers and litters of troglodyte young. They are more organized than typical troglodytes, because they have an intelligent king.
F3: Troglodyte Cave Entrance#
The cave entrance is guarded by four Troglodytes. They press up against the sides of the tunnel. Every six hours, the troglodyte guards here are replaced by four new Troglodytes from deeper in the caves.
F4: The Prison Pit#
This prison pit is where the troglodytes keep any prey that they capture. There are four Troglodytes in the room. In addition, two Troglodyte Brutes (see accompanying stat block) are hidden against the walls. They attack immediately and fight to the death.
Captured Centaurs. The young Centaur Trooper being held captive here is Kaluk, one of Hukar’s kin. The spitted centaur is Hirak, who can still be saved with healing spells if the heroes move quickly enough. He will die within five rounds unless healed. Both Kaluk and Hirak wish to leave the mines as quickly as possible.
F5: The Warrens#
This area seems to be a den of sorts. Straw mats lie along the edges of the cave covered in filth. The floor is littered with the bones of humans, centaurs, and other creatures.
This cluster of tunnels and caves are where most of the troglodytes dwell. The warrens are normally the resting place for dozens of the creatures, but when the heroes arrive, most of them are elsewhere. Two Troglodytes and two Troglodyte Brutes (see accompanying stat block) currently sleep in the caves. If they hear the heroes coming, the troglodytes will hide along the walls or in their own filth on the floors, preparing an ambush as the heroes investigate.
F6: Chilly Cave#
Three Troglodytes and a Troglodyte Brute (see accompanying stat block) are here. The southwest tunnel descends for several miles into the Underdark. This is how the troglodytes originally made their way to the surface. The vast network of caves that makes up the deep regions of the world are beyond the scope of this book.
F7: Brood Den#
The broodmothers are bigger than average and have the statistics of Troglodyte Brutes (see earlier in this section). They will viciously defend their young and fight to the death.
There are twelve troglodyte broodlings (8 AC, 1 HP). They hiss at the heroes, but do not attack. If approached, they try to bite the heroes, who must succeed on a DC 12 Dexterity saving throw or take 1 Piercing damage and have the Poisoned condition for 1 hour.
If the broodlings are not slain, they will grow into adult troglodytes within 1 week. This may create a minor moral dilemma for the party.
F8: Refuse Pit#
A darkened pit gapes in the center of this chamber. The sides of the pit are coated with wretched streaks of black and brown. You choke on the stench, which burns your eyes and nostrils.
This is where the troglodytes leave their waste. Entering this room requires each hero to succeed on a successful DC 15 Constitution saving throw or have the Poisoned condition for 1 hour.
Treasure. Buried 5 feet under the disgusting muck is a Mithral Breastplate, a Mithral Ringmail, an Adamantine Shortsword and an Adamantine Spear. None of these items radiate magic, so the only way to find them is to poke around in the refuse. Finding an item requires one minute and a successful DC 15 Intelligence (Investigation) check. Anyone who touches the filth automatically fails at any stealth-based activity until they can have a bath.
F9: The Troglodyte King#
This is the troglodyte king. He has possessed his Headband of Intellect for over a century, but it has brought him little cheer. He’s fallen into a deep depression, because he’s surrounded by filthy idiots all the time, and he has no one worth talking to. When the heroes arrive, he is eager to engage them in conversation.
The king is accompanied by two Troglodyte Brutes (see earlier in this section) and one female Troglodyte. The king is a Troglodyte Brute with maximum Hit Points and 19 Intelligence.
Game of Riddles. The king moans about the unfairness of his predicament and asks to engage the heroes in a game of riddles. Refer to the Troglodyte Riddles table for example riddles. He is evil to the core and plans to eat the party, no matter the outcome of the game. However, he desperately wishes to test his enhanced intellect against the heroes, so he would prefer to outsmart them.
Treasure. Aside from the king’s Headband of Intellect, he carries a single mithral ingot as a royal scepter. The scepter is worth 500 GP.
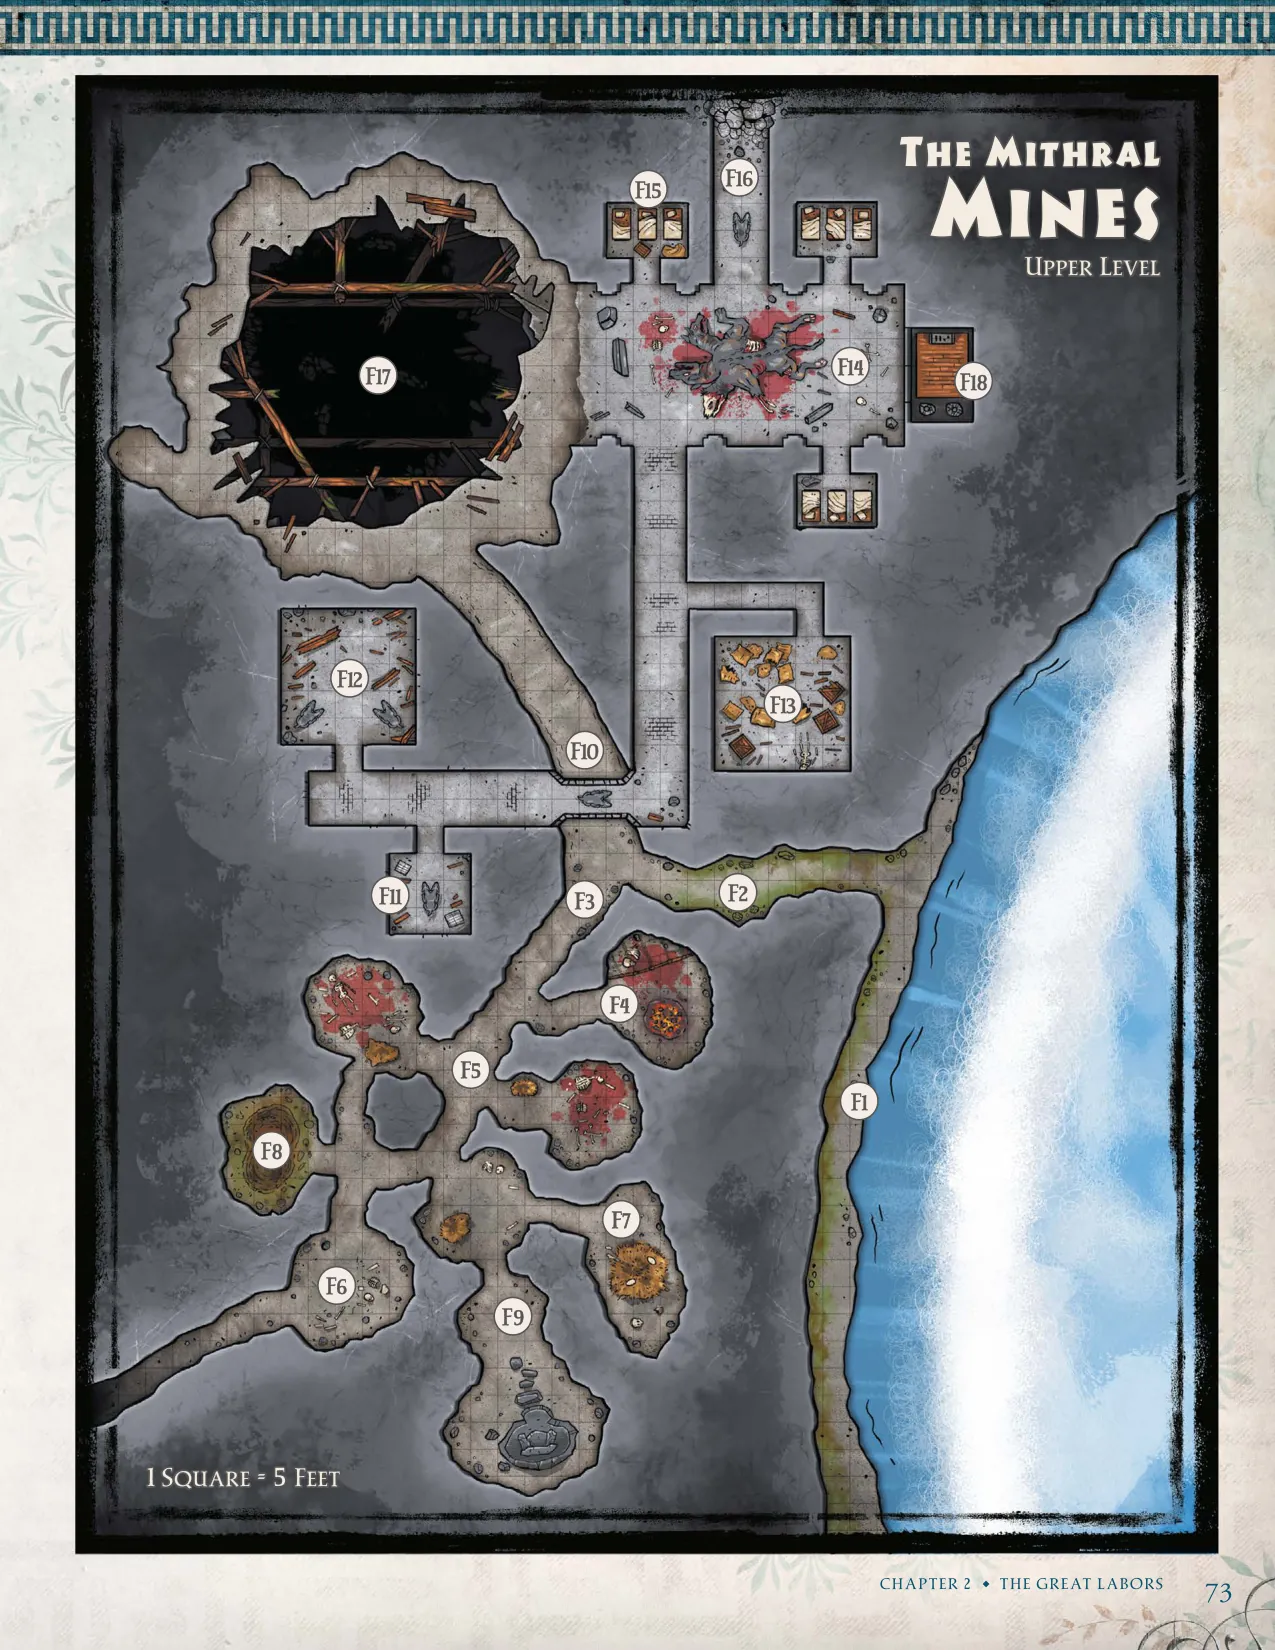
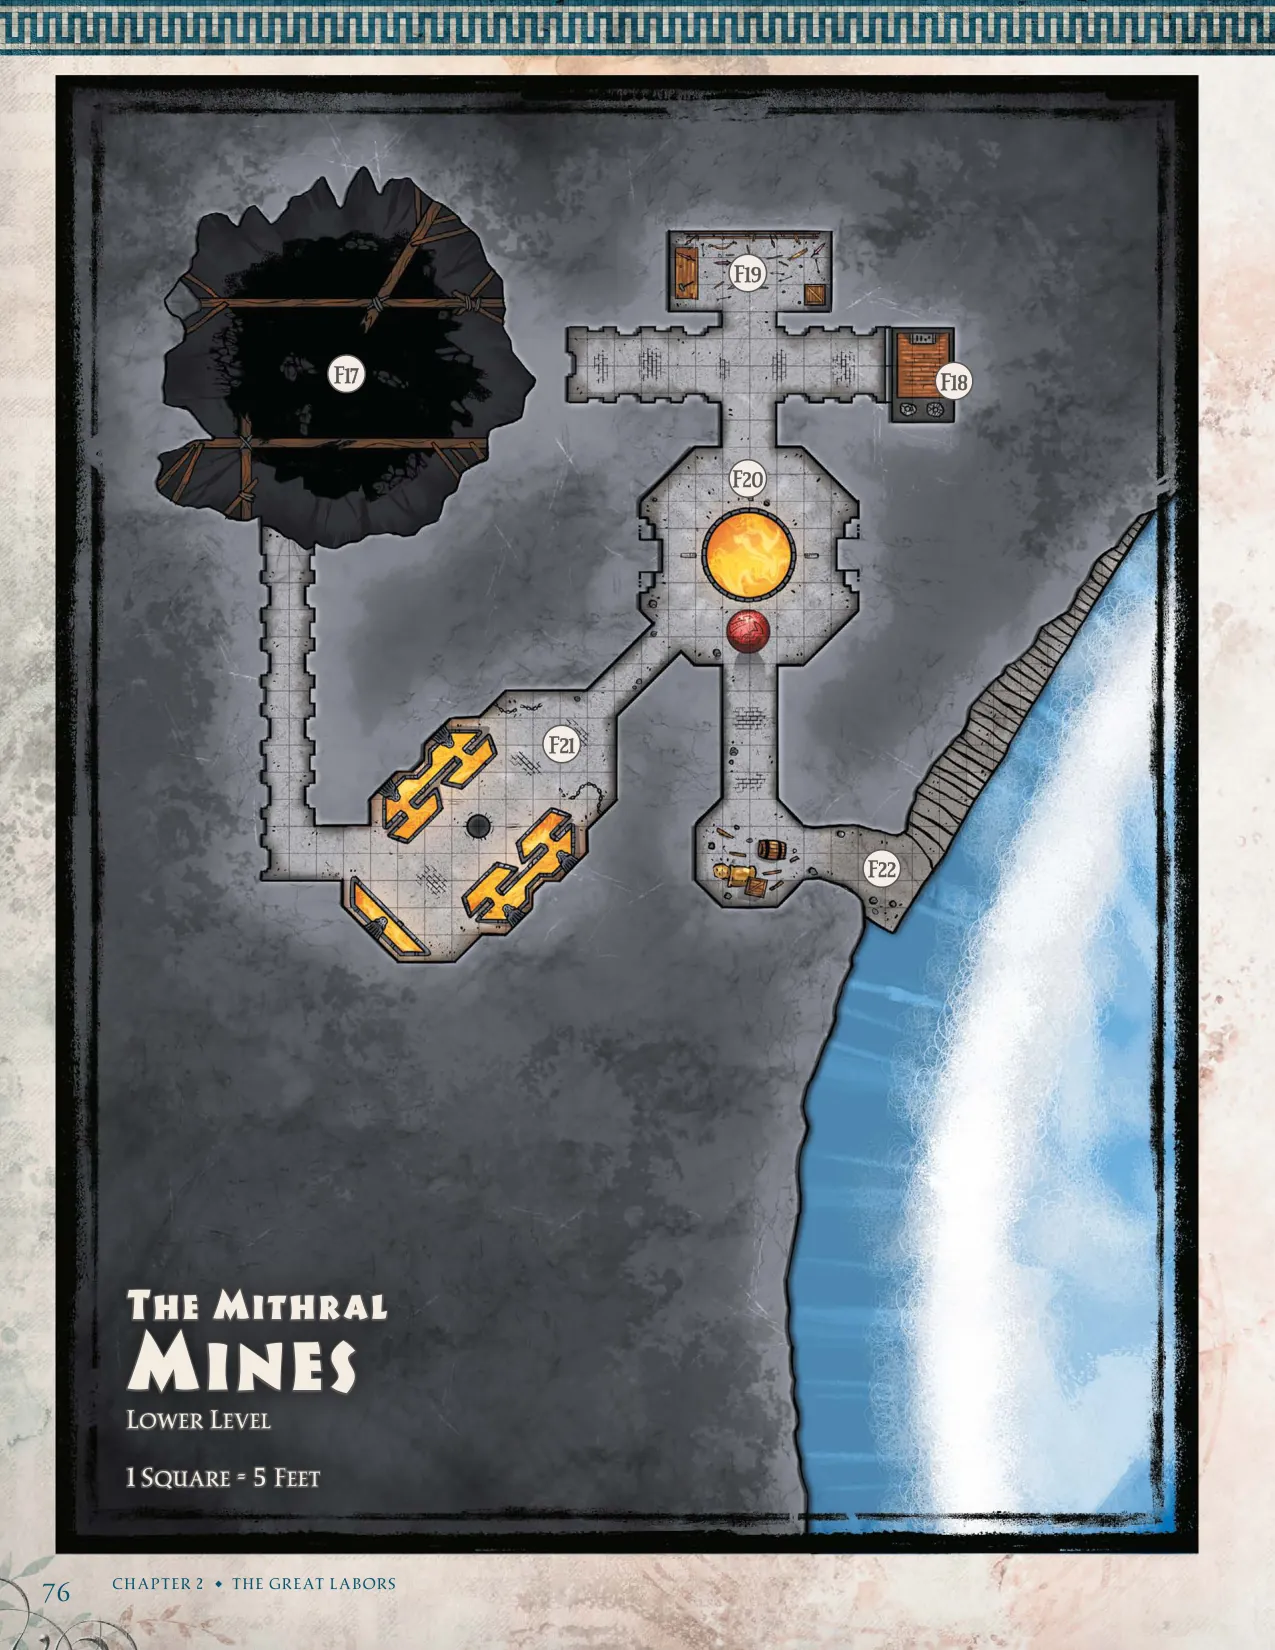
The Mithral Mines#
The mines were built out from a shaft that gives easy access to a vein of mithral and adamantine mineral deposits. The shaft descends for one mile into natural caverns that connect with the Underdark. The dwarves mined the easily accessible ore along the first 500 ft. of the shaft before they were driven out by the cerberus hound. The mithral and adamantine veins continue all the way down to the Underdark. Untouched since the dawn of time (except for the few decades the dwarves mined it), the deposits are the greatest lodes of mithral and adamantine in the world. The troglodytes inhabited the upper level of the mine until just a few days ago when the death dogs arrived.
F10: Broken Entryway#
The tunnel extends into the deep shaft where the mithral and adamantine can be found. Centuries ago, dwarves discovered the veins of the valuable minerals while exploring the natural caverns. The statue is a Death Dog that was petrified by a cockatrice. It awakens from its petrification 10 minutes after the heroes arrive.
F11: The Cockatrice Pens#
There is a single Cockatrice running around loose, and it attacks the heroes. The statue is another petrified Death
- Dog, which awakens after one minute and also attacks. These pens are used by the troglodytes to keep a flock
of cockatrices. The troglodyte king enjoys breeding them and fighting them against each other. He also uses the cockatrices to petrify prisoners so that they can be preserved for later consumption. Sometimes he serves a cooked cockatrice to ‘honored guests.’
Just a few days ago, the death dogs from the lower levels started exploring the upper levels. The dogs killed the troglodytes in this room, but one of the troglodytes let the cockatrices loose as a last resort. The cockatrices ran amok. Some were eaten by the death dogs while others used their power to petrify the beasts.
F12: Barracks#
There are two Cockatrices in this room. They attack when the heroes enter. The three death dog statues will awaken from their petrification 10 minutes after the heroes arrive. The Death Dogs awaken one at a time, every two rounds.
F13: Storage Room#
This was once a storage room for the dwarves. It was looted long ago.
F14: The Dwarven Hall#
There are three Death Dogs in this room. They attack and fight to the death. The cerberus appears to have been killed by something massive, which must have come up from the Deep Shaft (area F17).
Treasure. One of the dwarf skeletons wears a Mithral Chain Shirt. There are 25 dwarf skeletons whose skulls may be returned to the dwarves at The Dragon’s Tooth (area E8 in Estoria) for proper burial.
F15: Dwarven Quarters#
The dwarves took most of their possessions when they fled.
Treasure. The troglodytes have looted almost everything else, but there are a few valuables that can be scavenged.
Room One. There is a sack buried underneath the rotting furniture. It contains 65 SP.
Room Two. There is nothing of value in this room.
Room Three. One of the dwarf skeletons has a ring with an amethyst worth 250 GP.
F16: Entrance Hall#
This tunnel leads to the surface, but it is blocked by many tons of rubble which cannot be moved.
F17: The Deep Shaft#
There is nothing living here, but it has an ominous feel to it. There used to be wooden platforms that allowed dwarves to mine the mithral and adamantine, but most are gone and anything that remains is unusable. There are also pulley systems and ore pails along the sides. There is an entrance to the second level 100 ft. down the shaft, but the only way to reach it is to climb the sheer face of the shaft. Doing so requires three successful DC 15 Strength (Athletics) checks. Someone who manages this could use pitons and rope to create an easier path for everyone else. The shaft goes down for a mile, becoming increasingly hot before ending in a huge cavern filled with noxious gas. Stalagmites, stalactites, and a fiery red glow give it the appearance of some kind of hell. Falling to the bottom inflicts 70 (20d6) Bludgeoning damage. Every round spent in the gas-filled cavern requires a DC 10 Constitution saving throw to avoid being poisoned. This is actually an entrance to the Underdark which empties into a lake of magma. What lies beyond the lake is outside the scope of this book.
F18: The Dwarven Elevator#
This elevator leads 100 feet down to the Mithral Forge area, but it’s deadly to anyone who doesn’t know the
required password. The password is the word “dragon” in dwarvish (the troglodyte king knows this). The elevator is an elaborate and deadly fire trap.
Triggering the Trap. Inside the elevator is a lever to activate it. Once engaged, the elevator begins to descend. It takes 5 rounds to descend all the way. On the second round, all heroes inside must roll Initiative. On Initiative count 20 of the second round, black oil is pumped into the room from the mouths of the dragon heads on the top of the elevator.
On the third round, the roar of flames can be heard
from below and oil continues to be pumped into the room. On initiative count 10 of the fourth round, flames pour
through mouths of the dragon heads on the sides of the room, igniting the oil. Anyone in the elevator takes 21 (6d6) Fire damage at the end of the fourth round and the fifth round. At the end of the fifth round, the fire dissipates, and the
elevator doors open with a bell chime.
Disabling the Trap. The trap can be disabled by speaking the command word at any time, or by jamming the mouths of the dragons to prevent the flames from coming through. If the dragon heads are jammed, they glow fiery red, and the heat is intense. Heroes can pull the lever to take the elevator back to the upper levels, but descending again will restart the trap mechanism.
The Mithral Forge#
This is the central part of the Mithral Mines, where the dwarves forged the magical items used by the Dragonlords to defeat the armies of the Titans. The most obvious way to get down to the armory is by using the elevator, but it is also possible to reach the armory by climbing down the main shaft.
F19: The Armory#
The armory was ransacked long ago and all that remains is rotten wood, refuse, bones, and broken equipment. The armor and weapons are of exquisite make, but they have been rendered useless by centuries of neglect.
Treasure. There is a Mithral Xiphos (appendix C) buried under the refuse. It is covered in a layer of dirty grime and corrosion. It can be located with a successful DC 20 Wisdom (Perception) check or with the Detect Magic spell.
F20: The Lava Pool#
There are two Death Dogs resting here. They sit by the bronze device, but they don’t do anything except growl at the heroes. If anyone tries to touch the bronze sphere, the death dogs attack.
The Forgekeeper. In the lava pool is the Forgekeeper, a Salamander. She swims in the lava pool and is willing to talk to the heroes. She explains that the bronze device has been configured to keep her from escaping by blasting the area with cold unless it’s disabled. It was designed by the dwarves who originally built the forge. The Forgekeeper is aware of the history of the entire place and is willing to share the information if the heroes promise to disable the sphere. The Forgekeeper also knows the password to the elevator.
Triggering the Trap. Should the Forgekeeper leave the lava pool before the bronze sphere device is deactivated, it makes a clicking noise and anyone in the room is suddenly struck by the effect of a Cone of Cold spell for 36 (8d8) Cold damage. This cold blast repeats every five rounds until the bronze device is disabled.
Disabling the Trap. The device can be disabled by smashing the sphere (AC 18, 30 HP). When smashed, the sphere will release its magic across the entire room, inflicting 36 (8d8) Cold damage on everyone present. A successful DC 15 Intelligence (Investigation) check will reveal that the device can be jammed. If jammed, the device makes a grinding noise every round for five rounds, and then the trap triggers as normal.
The Forgekeeper’s Contract. Negotiating with the Forgekeeper draws the attention of the Young Cerberus (appendix B) hound in the adjoining chamber. The beast enters the forge, attacking with the death dogs.
Once freed, the Forgekeeper thanks the heroes. Long ago, dwarven smiths summoned her to the mortal world and bound her within their forge. Since then, she has powered the flames and during the First War served as Volkan’s metalsmith, helping craft mithral and adamantine items. By the contract’s terms, she must remain bound for five centuries unless the contract is destroyed.
She reveals Volkan never meant this to be permanent. He swore he would free her once the First War against the Titans ended. But Lutheria intervened, sending her Cerberus and making it impossible for Volkan to fulfill his oath. The Forgekeeper believes the contract tablet is kept in the Blast Furnace (area F21).
She can restart the forge and will do so if the heroes agree to free her. If given the contract, she melts it. Instead of returning at once to the Plane of Fire, she remains for one year to forge items for the party. Attempts to coerce her with the tablet always end the same way.
F21: The Blast Furnace#
This is where mithral ore was melted down into ingots. The blast furnace is guarded by a Young Cerberus (appendix B). He is intelligent enough to hold a conversation with the heroes and claims to be a servant of Lutheria, the Mistress of Death.
The hound’s mother was killed a few years ago by a great beast from the bowels of the earth. He took her place by devouring a half-dozen of his brothers and sisters. He won’t talk for long, because he’s very, very hungry. He has three mouths to feed, after all!
Treasure. The cerberus hound has gathered some of the dwarves’ ancient treasure. Coins totaling 56 PP, 125 GP, and 389 SP are gathered in a corner. There is also an Adamantine Trident and six Adamantine Javelins. The rune tablet that keeps the Forgekeeper bound to the Mithral Mine is part of this treasure hoard.
Event: Awakening the Forge. Only the Forgekeeper can awaken the Forge. Once the cerberus hound is defeated, she tells the heroes to wait, then slithers down a hole in the floor. Thirty seconds later, she returns from the same hole. Lava bubbles from the hole and begins to flow in rivulets through the room.
There are multiple levers throughout this area which can be used to tip a cauldron of molten lava or to cause jets of fire to blow out from vents.
Cauldron Traps. Choose two spaces on the map. These spaces are where the cauldrons will dump lava, doing 28 (8d6) Fire damage to anyone in the space.
Fire Vent Traps. Choose two spaces on the map. These spaces are where vents of fire will erupt, doing 14 (4d6) Fire damage to anyone in a 15 ft. line from the opening of the vent.
Encounter: The Troglodyte Horde. If the heroes have not defeated the troglodyte king, then awakening the Forge summons a horde of troglodytes to attack the forge area. One minute after the Forgekeeper awakens the forge, noises can be heard from the direction of the dwarven elevator by anyone with a passive Perception of 15 or higher. The Forgekeeper tells them that the sounds are similar to that made by a “strange and disgusting beast” that came to visit her a year ago. She describes the King of the Troglodytes and explains that she gave him the password to the elevator.
At this point, the heroes must roll Initiative. On initiative count 10 of the first round, the elevator door opens and a dozen Troglodytes, four Troglodyte Brutes (see earlier in this section), and the troglodyte king (Troglodyte
- Brute with maximum Hit Points and 19 Intelligence) emerge. The king will send four stealthy Troglodytes to scout out ahead of them. He plans to kill all of the heroes. The Forgekeeper provides hints as to how the party can use the forge’s many traps against the filthy creatures.
F22: The Secret Dock#
This room is a dock that is large enough for most ships. A beautifully carved bronze lever extends from the wall. It can be used to activate a stonework dam at the top of the river that creates a gap in the waterfall. Once the heroes have the Ultros, they may use this lever to dock beneath the waterfall and return to the Mithral Forge.
Using the Mithral Forge#
Refer to appendix C for information about how the heroes can make use of the Mithral Forge. When the heroes leave the Mithral Forge, read the following:
When Volkan builds an item for the heroes, the Keledone will only take a day to deliver it to the heroes, no matter where in Thylea they are located.