Approaching the Sunken Kingdom#
Read the following when the players descend into the ocean and approach the Sunken Kingdom:
Event: Massacre!#
Run this event when the party first arrives in the city.
There are twenty Merfolk Skirmishers under attack by a war party of ten Merrow and a Merrow Hag (see earlier stat block). Five of the merfolk are already dead. If the heroes come to the aid of the merfolk, they will try to convince the party to have an audience with their king. If the heroes agree to the audience, then the merfolk lead the party to the Merfolk Palace (area L1).
Random Encounters in the Sunken Kingdom#
When the heroes venture into the merrow controlled part of the city or the temple district, there is a chance that they might encounter something dangerous. Every time the heroes travel to another location in these areas, they roll on the following table.
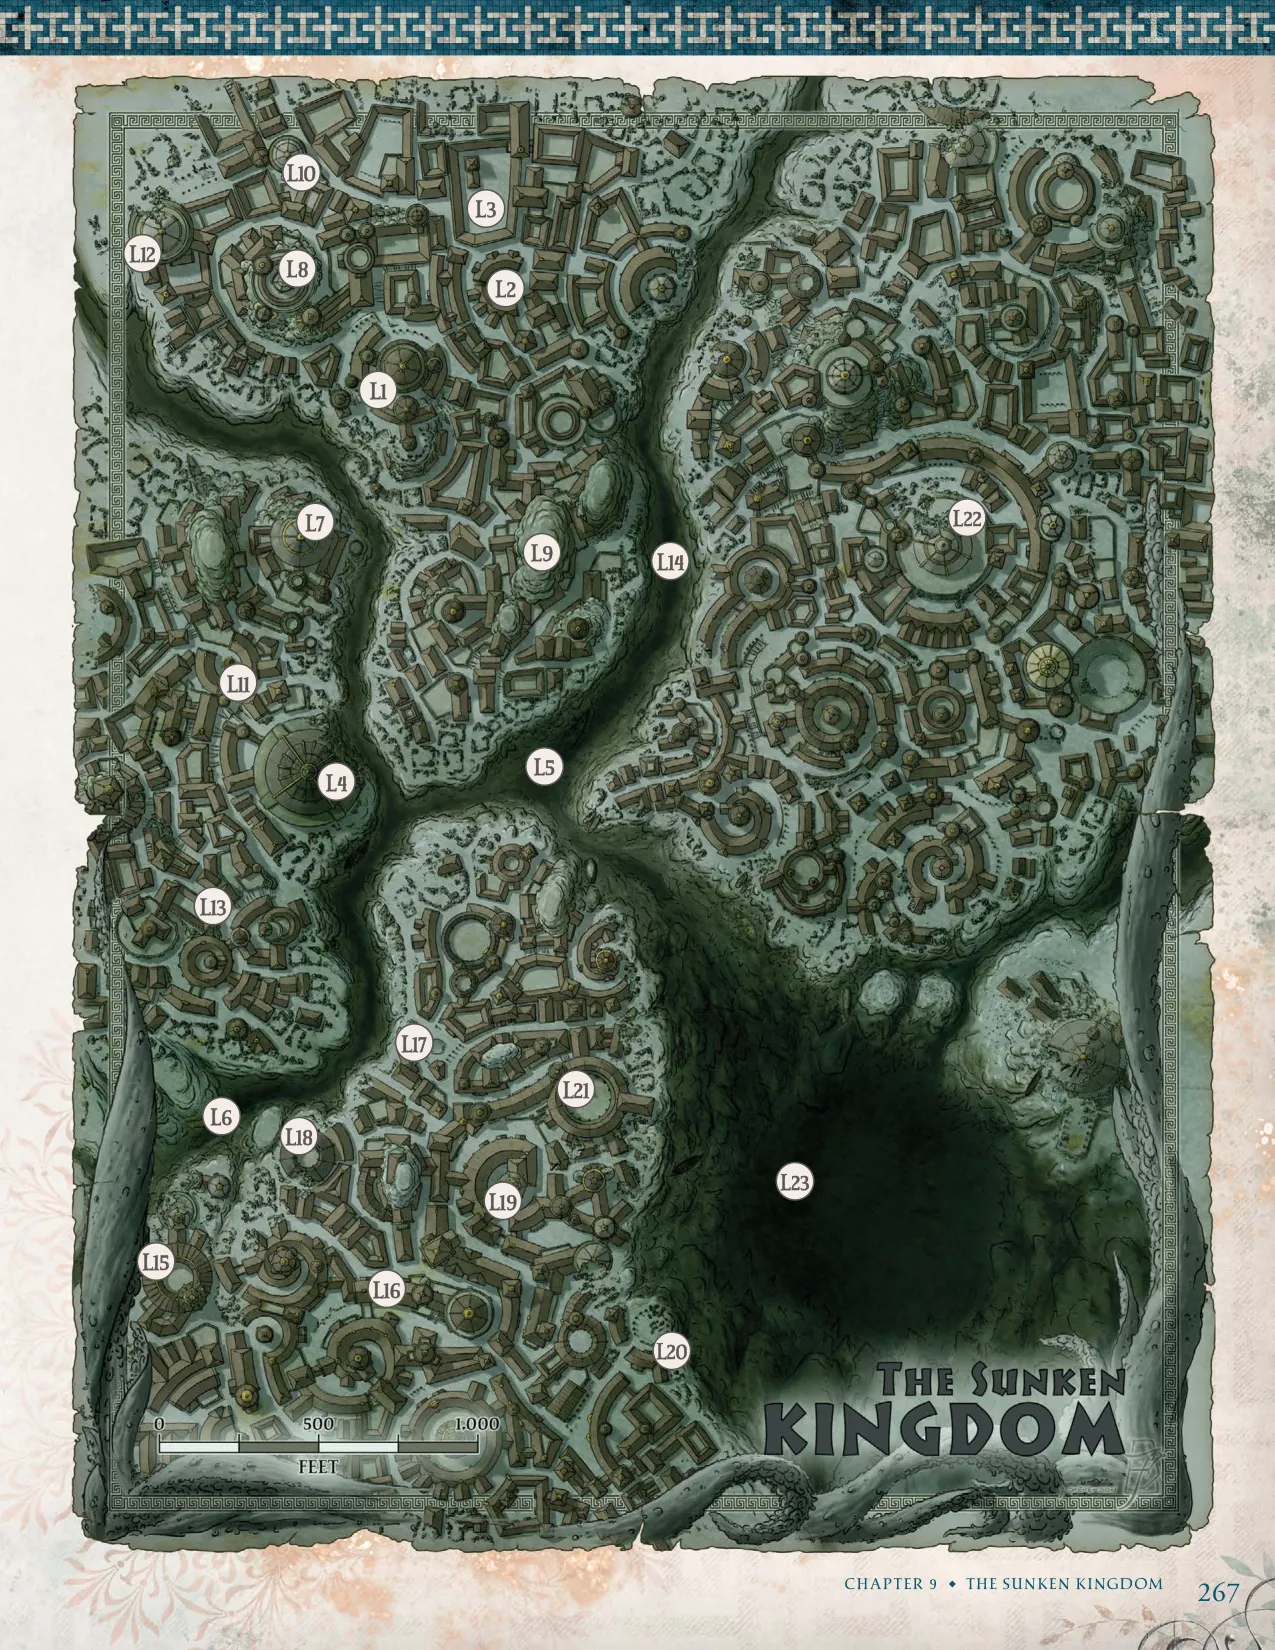
Sunken Kingdom Key Locations#
L1: Merfolk Palace#
The palace is the most heavily defended building in the kingdom. There are two dozen Merfolk Skirmishers and a dozen Nereid Nymphs (appendix B, The Great Labors) who garrison it at all times. The ruler of the merfolk is a powerful warrior-king named Pontus (LG merfolk
- Gladiator).
Meeting the King. If the heroes agree to an audience with the merfolk king, then they will be escorted into the palace.
King Pontus is grateful that the party has rescued his loyal servants. He answers any questions that the party pose to him.
Iolaah. Unless Iolaah the mermaid was killed, then she has been married to King Pontus in order to cement an alliance between him and the merfolk lord, Hywin. If the heroes befriended Iolaah during the Odyssey, then she will speak on their behalf with her husband. If Iolaah was killed, then Pontus is married to a merfolk named Amphitrite.
After King Pontus has answered the heroes questions, he will introduce them to his children.
Nereus and Psamathe. The king has many children, but his eldest are his son Nereus (CG Gladiator) and daughter Psamathe (NG Mage). They offer to give a tour of their city. They have heard tales that the heroes are the resurrected Dragonlords. Psamathe is a student of history and knows more about the origins of the Dragonlords than any surface dweller. If the heroes express interest, she will tell them the following story:
Nereus doesn’t wish to be shown up by his sister, so he will offer to tell the story of the city’s founding and how they met their gods.
Nereus will answer any questions the heroes have about the merfolk gods. Nereus and Psamathe will tell the heroes that the gods may be willing to assist them with their quest. They can be found in the Temple District (area L8).
The King’s Request. Once the heroes have finished with their questions and been shown the city by his children, the king asks for a favor. He recognizes that the heroes are powerful warriors who could strike a finishing blow against the evil merrow tribes. He begs the heroes
to bring an end to the war by assaulting the Merrow Fortress (area L6) and killing the warlord, Sheksis. He warns the party that she is in league with a coven of hags. If the heroes agree, the king assigns a war party of Nereid
- Nymphs (appendix B, The Great Labors) to accompany them. There is one nereid per hero. In addition, both Nereus and Psamathe accompany the heroes. The heroes and the nereid are given Giant Sea Horses as mounts.
L2: Merfolk Village#
The merfolk live in large families of up to a dozen. The nereid intermingle with the merfolk, though they live in their own private abodes. The party can purchase basic supplies at the merfolk shops here.
Everburning Globes. One of the items that the party can purchase are Everburning Globes. These are glowing red orbs that have been permanently enchanted with the Light spell. The merfolk use these globes to light the city, but they could also be used to light the way when diving into the darkest fathoms of the Chasm. They can be purchased for 10 GP each.
L3: Coral Farm#
The coral farms are guarded by six Nereid Nymphs (appendix B, The Great Labors). Merfolk come here to herd fish into their nets.
Curious Nereid. One of the nereid here takes an interest in the party. Her name is Kaila (CG), and she wishes to visit the Temple of the Fish Queen (area D4) to pay her respects. She asks whether the party will allow her to accompany them. Kaila has an intense dislike for oceanids and will strongly discourage the party from trusting them. She is a student of history and knows the legends of the fall of the Siren City if the heroes wish to hear it.
L4: Oceanid Lairs#
A dozen Oceanid Nymphs (appendix B, The Great Labors) call this tower home. Only 1d4 oceanids are here at any given time. The others are exploring the oceans or the Thylean coasts.
Curious Oceanid. One of the oceanids here takes an interest in the party. His name is Vyron (CN). He will approach and make them an offer. He has heard tales of a legendary trickster god of the Phaerosians who dwells in the Temple District (area D8), and he wishes to meet him. He asks to accompany the party. In exchange, Vyron offers to guide the party to a secret shrine where many of the ancient treasures of the Sunken Kingdom are hidden. This is the Forbidden Shrine (area L15). Vyron fails to mention that the shrine is dangerous and forbidden.
L5: Kelp Forest#
The kelp forest is a no man’s land between the merfolk settlements and the merrow territory. While the forest used to be a major source of food for the merfolk, it has become very dangerous for those who have to harvest the kelp. Violent clashes between merrow and merfolk are nearly a daily event. The kelp restricts visibility significantly. The entire forest is considered lightly obscured.
There is a 20% chance per hour of being ambushed by a war party of merrow. The war party consists of twelve Merrow led by a single Merrow Hag (see earlier stat block).
L6: Grotto of Whispers#
A natural amphitheater where currents carry whispers from far-off places. It is used by King Pontus to send messages and issue commands to far off merfolk colonies. Return messages come with the currents every midday and the king or one of his children will be here to receive them.
L7: Surface Observatory#
This tower houses seers who read the stars through the distortion of the sea. Shell mirrors and enchanted barnacles help them interpret omens. The seers are made up of six merfolk Mages. If the heroes come here, the seers are willing to cast the spell Divination to help them. They can only cast the spell once per day.
L8: The Beacon#
This shard of crystal is left over from the time of the Sirens. It guides distant merfolk home.
L9: The Library#
The ink on the wall is semi-sentient. It contains the accumulated lore of the Sunken Kingdom. A creature within 10 feet of the cliff can speak a question and the ink closest to them will shift into a response. This response will be equivalent to the Legend Lore spell. A creature may only ask a question once per day.
L10: Watch Tower#
This is a watch tower that monitors ocean currents and approaching threats. A single merfolk Scout receives messages through the current and then uses the kelp banners and signal shells to alert the rest of the city. Some messages are of a personal nature. While it is common courtesy to ignore such messages, most are careful with the content of their messages. Someone who speaks Primordial (Aquan) can understand the signals.
L11: Theater#
The theater is used for communal storytelling or musical operas that are performed in concert with the currents. The theater has rarely been used since conflict erupted with the merrow.
L12: Feast Hall#
Merfolk Commoners drink coral nectar and other beverages as they socialize and gossip.
L13: Barracks and Stables#
These barracks house the elite merfolk Knights and their mounts (Giant Seahorses).
L14: Crypts#
These undersea tombs are where honored dead are entombed in sarcophagi. Each of the sarcophagi is protected by a Glyph of Warding spell that triggers if anyone attempts to damage it or gain access to what is inside. A Thunderwave (level 6 version) goes off and anyone in 5 feet of the sarcophagus must make a DC 16 Constitution saving throw, taking 31 (7d8) Thunder damage on a failure or half as much on a success. This noise also alerts the entire city to the desecration of their tombs.
Treasure. If one of the sarcophagi is broken open, roll on the Sarcophagus Contents table. Use the Game Master’s Guide tables to determine the treasure.
L15: Forbidden Shrine#
This shrine is unguarded and empty. The inside of the shrine is lavishly decorated with marble statues, gemstone mosaics, and silver ornamentation. Merfolk skeletons are scattered across the floor.
The Forgotten Name. Written in mosaics on the rear wall of the shrine is the forgotten name of the Sunken Kingdom of the Sirens. The name has been cursed by Sydon and attempting to read it requires the reader to make a DC 20 Wisdom saving throw. On a failure, the reader experiences a terrifying vision of the city collapsing and being swallowed by the ocean. The reader believes that they are drowning, even if they can breathe water. Use the rules for Suffocation. The reader repeats the saving throw each round until they succeed or until they are reduced to 0 Hit Points. Succeeding on the saving throw reveals that the name of the city literally cannot be read—it has been erased from history by magic.
Treasure. The shrine is filled with ancient treasure chests, which the merrow have no use for. There are twelve chests, containing a total of 24,000 SP and 12,000 GP. Scattered throughout the chests are six star rubies and six star sapphires, each worth 1,000 GP.
L16: Siren Library#
Amongst the jellyfish that drift between the shelves there are three Aegaeon Jellyfish (appendix B). These creatures lurk amongst the shelves and attack any creature that they detect.
Treasure. Most of the glass cases have failed over the centuries and their contents have been destroyed. However, if ten minutes are spent searching then a successful DC 20 Wisdom (Perception) check reveals a single glass case that remains intact. Within the glass case is a Scroll of Protection (Monstrosities) and two Scrolls of Protection (Celestials).
L17: Graveyard#
These remains are of the original siren inhabitants of the city before it sunk beneath the waves. Amongst the bones are four Duskbloom Anemones (see sidebar earlier in this chapter). They will attack any creature that gets too close.
L18: The Feeding Pits#
This crumbled amphitheater has been turned into an abattoir by the merrow. No merrow are currently here but one minute after the heroes arrive, 2d4 Giant Sharks will swim into the amphitheater and begin feeding on the remains. As long as the heroes leave them alone, they will be ignored.
L19: Hag Temple#
This is an ancient temple gutted by the merrow and repurposed to be used by the coven of hags that rule over the other merrow hags. The entrance is well protected, but it’s not the gruesome statues that the heroes must be wary of, but rather the colorful sea anemones. There are three Duskbloom Anemones and three Maw
- Anemones (see sidebar earlier in this chapter) that grow along the walls. Further into the temple, past a partially collapsed doorway is a chamber where the coven of Merrow Hags (see stat block earlier in this chapter) can be found.
There are two Chorus Anemone amongst the anemones on the statues. They will start a garbled, haunting melody when the heroes enter the chamber. The Merrow Hags will then attack and fight to the death.
L20: Shrine to Scylla#
This is a shrine dedicated to Scylla. The merrow regularly make sacrifices to her with offerings of freshly killed meat. There are five Merrow being led in a ceremony by a single Merrow Hag (see stat block earlier in this chapter). They attack anyone intruding on their ceremony.
L21: Merrow Fortress#
The merrow have fortified this building with marble taken from the surrounding ruins. At any given time, there are twenty Merrow within the fort. The merrow are ruled by a warlord named Sheksis (see accompanying stat block). Sheksis has a coral horn that she can blow to summon 1d4 Giant Sharks from the depths of the chasm. It also summons the Merrow Hags from the Hag Temple if they are still alive.

If the merrow fortress is attacked, Sheksis will send a dozen Merrow out to do battle while she summons the giant sharks and hags. Five rounds into the battle against the merrow, Sheksis will arrive with the coven of hags (if they are still alive) and any sharks that she has summoned. Sheksis will send the remaining merrow against any merfolk attackers, while she attacks the heroes. If she and the hags are defeated, the remaining merrow will flee.
The King’s Trident. Sheksis wields a Trident of Fish Command, which rightfully belongs to King Pontus.
L22: The Temple District#
Refer to The Temple District section for details.
L23: The Chasm#
Refer to The Chasm section for details.