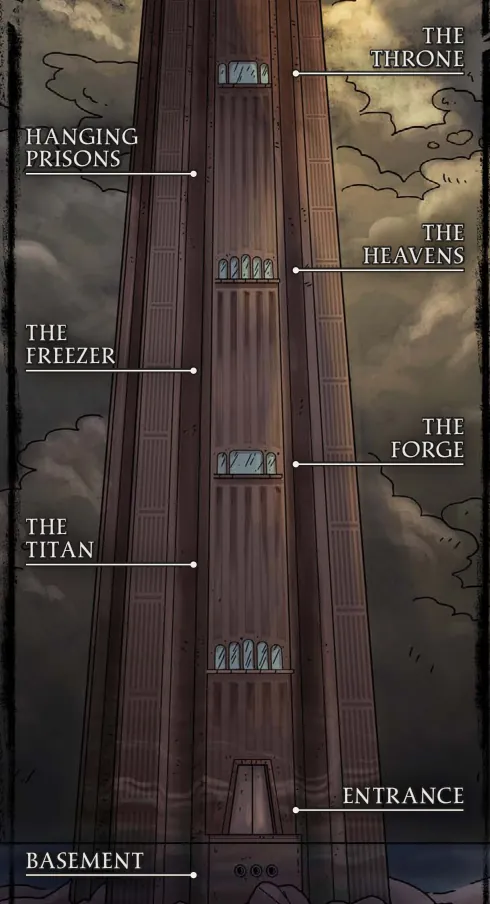
Paths Through the Tower#
There are many different methods to travel up and down within the tower. At its center is a spiral staircase that climbs from ground level all the way to the tower’s summit. The staircase was built for giants, so a human-sized creature will find the constant climbing rather exhausting. Some levels are connected by a cleverly constructed elevator that was built when Sydon still possessed the divine power of artifice.
Bronze Pipes. Huge bronze pipes run from the underwater basement and feed water to all of the floors, and sometimes aquatic creatures use these pipes. They swim with the current in the pipes to move about the tower.
Griffon Mounts. The griffons that roost on the window ledges of the tower could potentially be used as mounts by anyone intrepid enough to figure out how to tame them. Although the griffons are monstrosities, they can be targeted with Animal Friendship and other spells that target beasts. Mounting a charmed griffon requires someone in the party to make a successful DC 18 Wisdom (Animal Handling) check.
Inhabitants#
Many creatures live within the Tower. Some spend their entire lives inside and never actually bother with the outside world. The tower inhabitants go about their daily activities as described in each room or chamber description, unless the tower is alerted.
Alerting the Tower#
When they are attacked, gygans, minotaurs, and centaurs will send one of their number to the central stair to alert the tower. If the horn on the central stair is sounded, the tower moves to an alert status. At this point, creatures will take the actions described in the Inhabitants of Praxys table on the following pages.
Event: March of the Titans#
At any time, you may choose to have Sydon deploy a full detachment of his army from the Heavens down to the docks. Sydon has been sending his soldiers down each day to join his gathering war fleet. The full detachment consists of two-hundred-and-forty Gygans, ten Gygan Heroes, twenty-four Minotaur Warriors, and four Minotaur Berserkers (all found in appendix B)—all armed for war.
The detachment marches down the stairs, stopping at each level to rest and give prayer to Sydon. It takes four hours for them to reach the lowest level. They will only stop if they are directly attacked. Otherwise, they ignore what is happening on the levels—they know that Sydon and his children will deal with intruders.
You can use this event to close off the main stairway in order to force the heroes to find another route to the upper levels. You can also use it to foreshadow the looming conflict in the Battle of Mytros.
Praxys General Features#
Ceilings. The ceilings are 30 feet high unless otherwise noted.
Doors. The doors are bronze unless otherwise noted. There are three types of doors. The small doors are 5 ft. wide and 10 ft. high. The large doors are 10 ft. wide and 25 ft. high. The double doors are each 5 ft. wide and 25 ft. high. Opening a large or double door is easy for large creatures. Medium and smaller creatures must use an action, and opening the doors requires a successful DC 10 Strength (Athletics) check.
Lighting. All of the rooms are lit by a single Driftglobe that emanates light using the Light spell. Unlike the standard light spell, this light lasts for 8 hours before ending. All of the inhabitants of Praxys know the command word for the Driftglobes. If the Driftglobes are taken from the tower, they cease to be magical.
Deafening Forge. The sound of distant furnaces, hammering, and machinery can be heard throughout the tower. On the Forge level these sounds are loudest, but on the other levels it can still be heard as ambient background noise. The sound makes it difficult for tower inhabitants to hear the sounds of battle in rooms that are close by. The DC for all Perception checks to listen are also increased by 5.
Forbiddance. Each floor of the tower is protected by a permanent Forbiddance spell. The Forbiddance for one floor can be canceled by a Dispel Magic at DC 19. The Forbiddance makes teleporting into the tower or using magical gates or ethereal travel to gain entry impossible. Sydon and his children know the password to ignore the Forbiddance.
Basement Locations#
This underwater complex is where water is pumped into the rest of the tower. Sewage and waste is also disposed of through here. Spotting the inlet and outlet pipes from the deck of the Ultros is a trivial task. Anyone who briefly searches the shoreline will see them in the water.
Water Intakes#
This pipe is where water is drawn from the ocean into the Water Pumps chamber (see below). The current is gentle and constant, making this an easy pathway into the tower. The heroes only need to hold their breath to be drawn through, and the pipes are large enough to allow a centaur-sized creature to pass.
Sewage expulsion#
This is where sewage is expelled from the tower. It is possible to enter the tower through this outflow, but as the pumped water is flowing outward, it is not ideal.
A successful DC 15 Strength check is necessary to battle through the artificial current. In addition, the pipes are fouled by centuries of filth and are now home to a half-dozen Gibbering Mouthers who occupy the seaward end of the pipe, feeding on everything that flushes through it. These hideous creatures will attack anything that enters their lair. Traveling all the way up these pipes leads to the Waste Room (area S22).
Inhabitants of Praxys (Continued…) Area Minotaur Barracks (area S21) Waste Room (area S22) Chamber of Love (area S23) Chamber of Music (area S24) Breeding Chamber (area S25) Great Arena (area S26) Dragon Stables (area S27) Throne Room (area S28) Main Hall (area S29) The Vault Entrance (area S30) Hall of Fallen Heroes (area S32) Room of Far Sight (area S33)
Creatures Behavior When Tower is Alert 2 Minotaur Warriors They arm themselves and head to the Sparring Chamber (area S15). (appendix B) 1 Blemys (appendix B) The giant will remain in the room, and attack anyone—even tower inhabitants—who enter his freshly cleaned chamber. Young Hyperion Great Arena Talieus ( , Talieus will make his way to the (S26). The nymph will Aurae Nymph appendix B), 1 remain in the chamber. The Great Labors (appendix B, ) 3 Satyr Minstrels (appendix B), The gygan heroes will make their way to the Gygan Barracks (S20), 2 Gygan Heroes (appendix B) and then to the Sparring Chamber (S15) before returning here if they find no threats. The satyrs remain in this chamber. 1 Silver Dragon , The gygans remain in this chamber to watch over the captive dragon. 2 Gygan Heroes (appendix B) Young Hyperion Normally empty Talieus ( , appendix B), son of Sydon, will make his way Goatling Tricksters here when the tower is alerted, accompanied by 6 (appendix B, The Great Labors ). 1 Young Copper Dragon , The dragons are released into the Great Arena (S26) to attack 1 Young Bronze Dragon , prisoners and the heroes. 1 Young Silver Dragon Normally empty Sydon travels here if he senses that there are intruders on the floor. 2 Iron Golems The golems patrol the area without having to be specifically activated. Cerberus 1 (appendix B) The cerberus remains in this room. 1 Euryale (appendix B) The medusa remains in this room. Alecto, Megaera, Tisiphone The three Furies remain in this room. ( Erinyes )
Water Pumps#
The chamber is 40 ft. in diameter with a 10 ft. ceiling. A doorway on the opposite side of the room leads to a sea hag’s lair (The Bowl). This room is where water is pumped up into the higher floors of the structure—no trivial job, given the height of the tower. The machinery is also imbued with some ancient magic that removes most of the salt from seawater.
Bronze Pipes. There are two bronze pipes in the ceiling, each 5 ft. in diameter. The first pipe pumps water to rooms S5 and S10 of the tower. The second pipe pumps water to room S19 of the tower. These pipes are large enough to allow Medium-sized creatures to swim through them. Swimming through them becomes more difficult if the pumps fail, but it’s still possible.
Merrow Tribe. A tribe of one-eyed Merrow operate the pumps, and all have the Poor Depth Perception trait typical of cyclopes, because they only have one eye. The merrow have Disadvantage on any attack roll against a target more than 10 feet away. There are eight of them in this chamber, but they are too busy to worry about trespassers. However, they will defend themselves if attacked, and they will answer the sea hag’s call, if she summons them to The Bowl.
The Bowl#
This room is 30 feet in diameter. A Bowl of Commanding Water Elementals is embedded in the floor in the center of this room. An ancient Sea Hag lives here, and she is hostile to any intruders.
Once the hag is aware of intruders, she will summon the Water Elemental from the bowl to kill the heroes. She also summons the eight Merrow from the Water Pumps chamber, who arrive within 1d4 rounds if they are still alive. The hag is a lonely coward, and if the heroes give her the Bloodied condition, she quickly surrenders. If questioned, she explains how the bronze pipes can be used to traverse the tower and reach the higher floors.
Entrance Level Locations#
The main entrance to the tower is protected by adamantine gates, powerful spell wards, and an entire detachment of gygan soldiers. However, if the main doors can be opened by force, then the party can enter the tower through this massive antechamber.
A 20 ft. wide bridge leads to the central staircase that ascends all the way to the top level of the tower. The staircase was built for huge creatures, and even gygans treat the stairs as Difficult Terrain. Fifty feet below the


bridge, the central shaft disappears beneath the water. Three huge bronze pipes run upward along the walls.
Six Gygans and two Gygan Boxers guard the entrance chamber (see appendix B for both). They can see outside through a one-foot diameter bronze spyhole in the door, which can be opened and closed. The gygans will only open the doors for gygans who know the password (“Hergeron”)—or for Sydon or one of his hyperion children.
The water is home to a Giant Shark. The gygans feed the shark once a day with a chum bucket (which may be a clue for the heroes that something lurks in the pool). In combat the gygans will use their grapple ability and try
to toss injured enemies into the water, to be eaten by the shark. Due to the murkiness of the water, the shark gains Advantage against anyone who doesn’t have Blindsight.
Chamber Level Locations#
Between the main levels of the tower, there are three chamber levels. The chamber levels have 100 ft. ceilings and they are mostly empty. The central staircase passes through the middle of each of these chambers, and adamantine chains anchor the stair at regular intervals. Bronze piping runs vertically through the chambers, connecting the Water Pumps to the upper floors.


Chamber Level 1: The Titan#
This is where Hergeron (CN Hyperion, appendix B), the Titan, has been imprisoned by Sydon. Unlike the other chambers, this one is only 10 feet in height. Hergeron lies naked and twisted in a half circle around the stairs. His legs are pinned to the floor by adamantine spikes that run from the floor to the ceiling. The hyperion is now completely insane, and this can only be cured by a Wish spell. He is also trapped by powerful magic, and only another Wish spell can free him.
If the party speaks to him, Hergeron is almost entirely incomprehensible and obviously in great pain. However, it’s clear that he’s trying to communicate something of great importance to the party. Some of the intelligible phrases that he speaks are like riddles:
Take the flame from the silver star and lure its dying,
forgotten love away from the celestial sea! Sydon has twisted the dragons into something wretched
—the silver mother will not forgive him!
If someone casts a level 3 or higher healing spell on Hergeron, it will take away his pain and calm him for a few minutes. In this case, he is coherent enough to answer questions. He has a vast memory, and he knows much about what is happening in the tower. Asking him questions is equivalent to casting a Commune spell.
Hergeron’s Cryptic Words. Hergeron’s riddles refer to the Fallen Star (area S37), and the clone of Balmytria in the Dragon’s Chamber (area S25). If his pain can be eased, then he will explain the riddles.
Chamber Level 2: The Freezer#
This is a freezer for perishable foods. Everything in this 100-foot-tall chamber is coated in ice. Bare skin instantly sticks to objects in this room, so the party should be careful touching things or walking barefoot. Peeling away stuck hands or feet requires an action and causes 1d4 Cold damage.
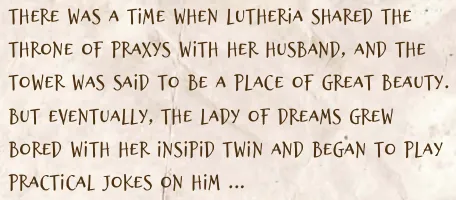
Storage Platforms. The adamantine chains connected to the central stair are coated in ice. The tops of the icy chains have been smoothed and can be used as paths to reach the walls. Platforms have been carved into the ice walls and are stacked with barrels, slabs of meat and fish, casks of wine, crates of grain, and many other foodstuffs. Ladders have been carved into the ice to allow the tower’s inhabitants to climb up and down to different platforms to reach the stores. There was a time when Lutheria shared the throne of Praxys with her husband, and the tower was said to be a place of great beauty. But eventually, the Lady of Dreams grew bored with her insipid twin and began to play practical jokes on him. Sydon once demanded a chorus of voices be raised to celebrate the forging of his glaive. Lutheria captured hundreds of sirens and brought them before the throne …
Gygans. Every day, a party of six Gygans (appendix B) arrives at dawn, noon, and dusk to collect food for The Kitchens (area S13). They attack trespassers without hesitation.
Chamber Level 3: The Prisons#
This prison for Sydon’s captives echoes with the hopeless cries of prisoners, and the melodious, seductive singing of
- Harpies. There are ten cube-shaped cages hanging from the ceiling at various heights. You may choose which prisoners to put in the cages. Here are some suggestions:
Any NPC from appendix A that the heroes have yet to
meet on their travels. Crew members from the Ultros who have been taken
prisoner by Sydon’s children and servants while the heroes have been busy exploring the tower. A selection of Amazon warriors, Mytrosian sailors, and
long-neglected dead prisoners.
Terrifying Nest of Harpies. Three dozen harpies have been encouraged to nest along the walls. They torment the living prisoners with songs, but they ignore anyone traveling up the central stairway. If someone tries to interfere with the harpies or their prisoners, then the harpies will attack. They have significant advantages due to their numbers.
The harpies use their Luring Song on trespassers, and each trespasser will be targeted by 1d6 Harpies. Each hero must make a saving throw against each song at Disadvantage. The harpies fly close to the ceiling, so that if someone throws themselves from the stairs to reach them due to the luring song, that creature will fall and take 35 (10d6) Falling damage. Anyone who falls will be attacked by a dozen harpies with Advantage on their claw and bite attacks. If half of the harpies are killed, then the surviving harpies will flee through a small hole in the wall and roost outside the tower.
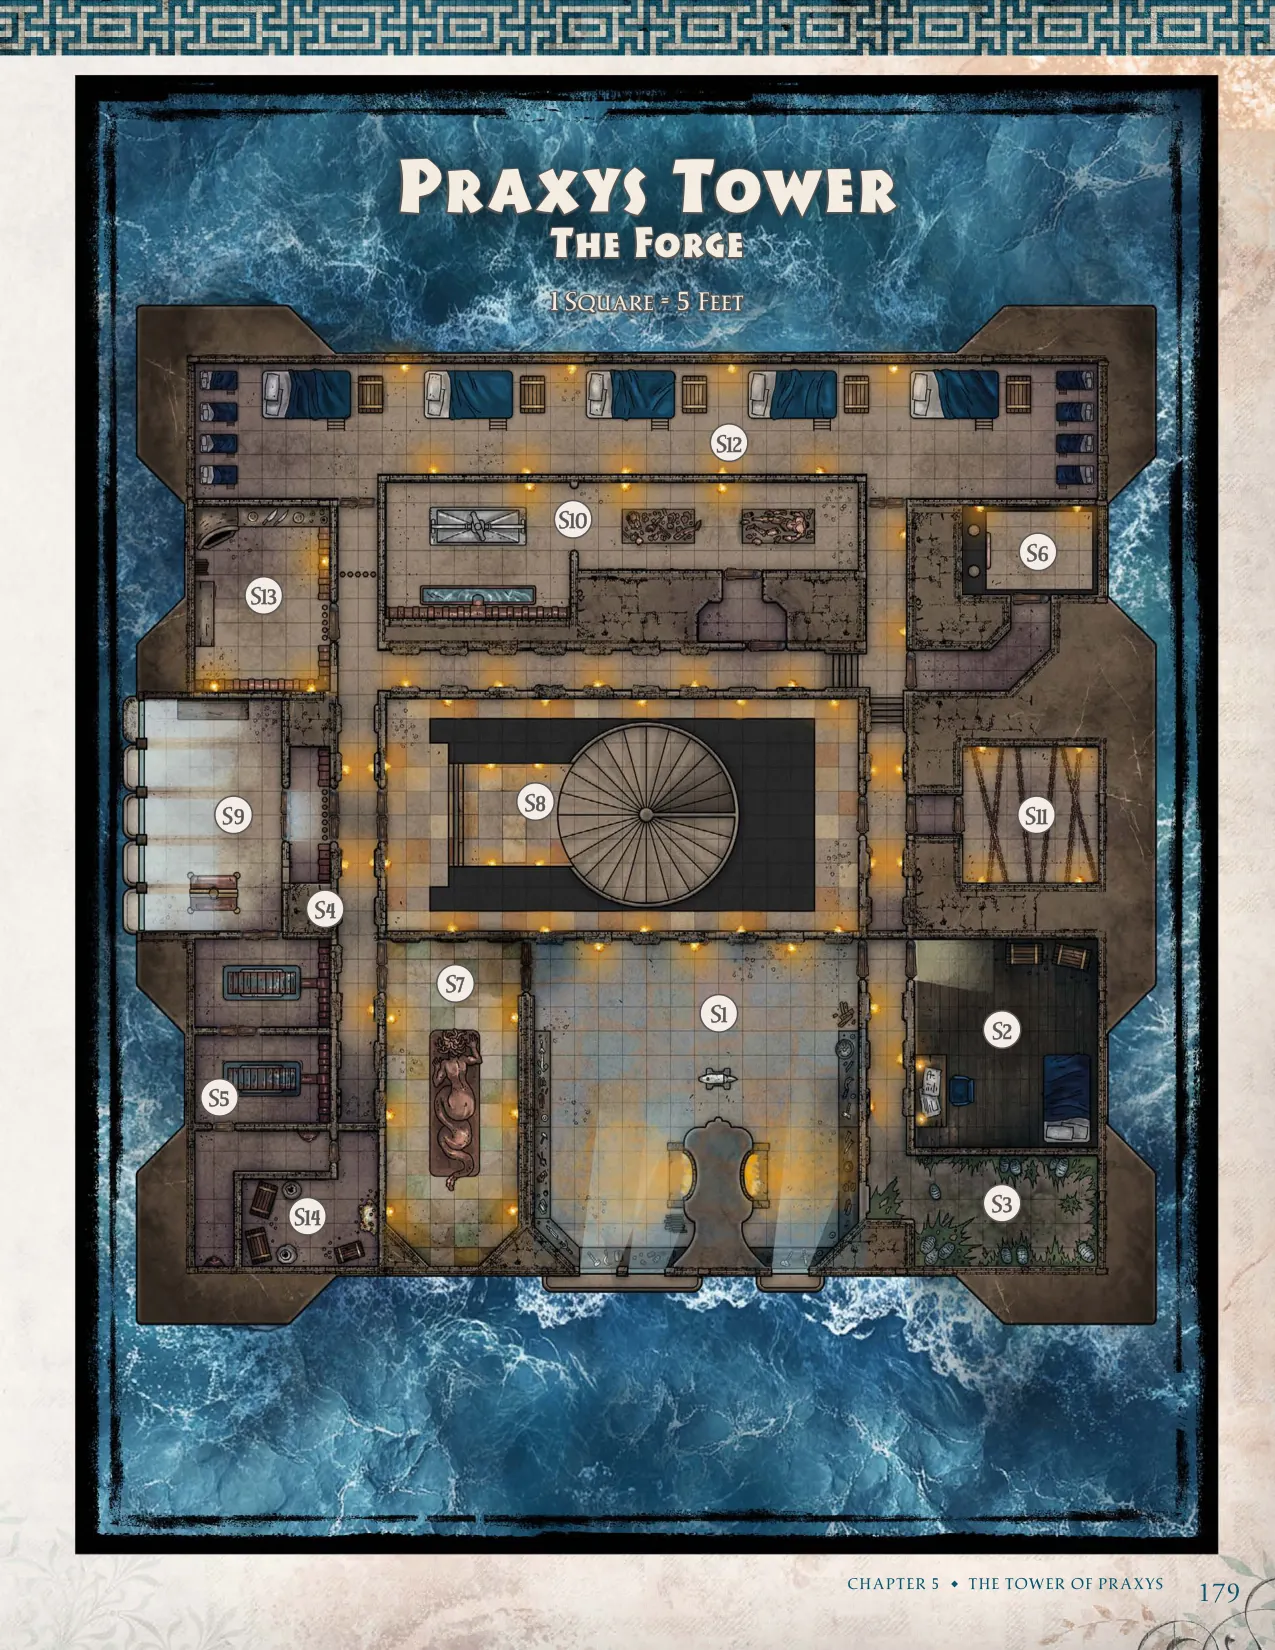
The Forge Locations#
The forge is used by cyclopes and gygans to build weapons, armor, automatons, and golems for Sydon’s coming war against the mortals of Thylea.
S1: The Forge Room#
Garzoon (CE jancan Mage) works at the forge, building weapons, golems, and constructs. He has gone slightly mad from centuries of overwork, but he’s still one of the finest smiths in all of Thylea. He has enough of his wits remaining to trade the password to The Treasury (area S14) in the event that this life is threatened.
Garzoon is assisted by twelve Myrmekes Legionnaires (appendix B); they are effective servants due to their intellect and ability to learn quickly. They are also utterly loyal, because Sydon keeps their queen as a prisoner. Garzoon attacks trespassers in his forge, and the myrmekes assist him.
If Garzoon is defeated, the myrmekes will immediately stop attacking and then ask the heroes to free their queen. They speak telepathically, but their minds are so alien that no other thoughts can be understood. The myrmekes will not aid the heroes in any way, even by giving out information about the tower, because they fear Sydon’s potential retaliation on their queen.
The Bronze Trap. At the center of the room is a giant-sized lever that can be pulled to trigger the trap in the Iron Saddle (area S7), if it hasn’t yet been triggered. If the trap has been triggered already, then the lever can be pulled to unblock the door by raising the adamantine block via a pulley system in the ceiling. Pulling the lever requires a combined Strength of 20.
The Windows. The windows in this room are permanent Walls of Force which cannot be dispelled.
S2: Garzoon’s Chambers#
This is where Garzoon the cyclops sleeps and lives. He keeps his clothes and money here, but his most prized possessions are in The Treasury (area S14). His room is neat and tidy so that he can immediately tell if anyone has touched his things—a sign of his madness. He believes that he is being watched all the time—by everyone!
Garzoon’s Journal. On the nightstand is the giant-sized journal where Garzoon records his thoughts (in the Giant language). Anyone reading the journal will quickly realize that Garzoon is paranoid and slightly insane. He trusts no one, and he hints at a secret treasury that no one knows about—not even Sydon.
The journal makes it obvious that Sydon is pushing Garzoon hard to prepare an army to conquer the people of Mytros. Garzoon loves to forge weapons and armor, but he’s a perfectionist who hates to be rushed. His journal includes fantasy scenarios where he quits and Sydon is forced to beg him to come back.
Treasure. The chest at the foot of the bed contains 15,000 SP and 3,000 GP. Many of the coins are very ancient and depict six-armed cyclopes wearing laurel crowns.
S3: Myrmekes Den#
This chamber is the lair of the myrmekes. There are usually a dozen Myrmekes Legionnaires (appendix B) resting up at any given time. They are not hostile unless provoked, and they will communicate telepathically with anyone who enters their lair peacefully. A certain caution on the part of visitors is acceptable; open aggression is not.
The myrmekes explain that they are Sydon’s unwilling servants, because their queen is being held prisoner. The myrmekes will beg the heroes to free their queen and help them regain their freedom. Once the queen is safe, the myrmekes are quite clear that they will do anything possible to assist the heroes.
S4: The Bronze Pipes#
The bronze pipes provide water for all but the topmost tower levels. Six Water Weirds patrol the pipes to keep them clean. For every 10 minutes spent in the pipes by any group of heroes, there is a 25% chance of being attacked by two of the water weirds. The party needs some form of waterbreathing in order to traverse the pipes without drowning.
The pipes take water to The Water Wheels (area S5) and to the Golem Workshop (area S10). A tiny-sized creature can access a pipe leading to the Kitchens (area S13). The pipes also carry water further up the tower, and the heroes can use them to reach The Baths (area S19).
S5: The Water Wheels#
The huge water wheels power much of the machinery on this tower level. The two Blemys (appendix B) do the necessary work to keep the machinery running. They have very little room to move about the cramped chamber, but they fight to the death anyway.
Bronze Pipes. This room can be accessed via the network of bronze pipes that runs through the tower (see The Bronze Pipes, area S4). Anyone entering the room through the pipes must succeed on a DC 15 Dexterity saving throw or take 7 (2d6) Bludgeoning damage from the wheels. The pipes can be entered with a successful DC 20 Strength check to fight through the current of outflowing water. The water drains at the bottom of the wheel, but there is only enough room for a creature of tiny size to squeeze through. The drains lead to the sewage pipes and eventually the ocean.
Secret Door. The entrance leading to The Treasury (area S14) is concealed in the southern wall by dirt and oil. It can be detected with a passive Perception check of 15, or by an active search (no check required).
S6: The Elevator#
The bronze elevator is a moving room that can take anyone up to the next level of the tower. It is guarded and operated by one Gygan (appendix B) who will attack anyone who doesn’t look like an inhabitant of the tower. The elevator can be used to access The Heavens (area S17).
Activating the Elevator. A bell hangs down from a large hook and is obviously meant to be struck to start the chamber’s movement. It is not, however, a mechanical device—it is actually powered by a flock of twelve
- Harpies. They nest along the elevator shaft, and when the bell is wrung, they fly down and grab hooks in the top of the chamber. The harpies are strong enough to move the elevator upwards by one level, and then they must rest for 1 hour. The elevator descends via gravity, and its speed is slowed by a system of gears. The harpies are mostly harmless since they can’t get at
anyone in the elevator. However, if they are annoyed by whoever is using the elevator, they will use their Luring Song and laugh as anyone inside the elevator futilely tries to reach them through the bronze lattice work.
S7: The Iron Saddle#
This entrance hall to the Forge Room is trapped, thanks to Garzoon’s creative insanity and hard work. The double doors leading into the Forge are made of adamantine and barred from the other side. If the knocker is used, a small viewing window will open in the door and one of the myrmekes will ask for the proper password (“Noozrag”). Garzoon activates the trap from the Forge Room (S1) after three failed attempts.
The Magma Trap. The entrance door seals thanks to an adamantine block some 5 feet thick. Two holes open in the ceiling and magma pours into the chamber. The flow covers the floor within one round. Anyone in contact with the magma takes 55 (10d10) Fire damage. The air of the room becomes superheated by the 4th round, and anyone in the air takes 21 (6d6) Fire damage.
The Medusa Statue. The one apparently safe place in the chamber is the statue. It remains cool, as does the air within 5 feet of it. Its saddle can hold six Medium-sized
creatures. However, one round after someone sits in the saddle, the statue will begin to buck.
To stay in the saddle, a creature must make a successful DC 10 Dexterity (Acrobatics) or Strength (Athletics) check. On a failure, they are flung 10 feet in a random direction into the magma. The DC of the check increases by 1 every round. Someone sitting in front or behind a creature who loses their grasp in this way can use their reaction to make a DC 15 Athletics check to grab them and keep them safely on the saddle.
After five rounds, the magma drains into a chamber below. One round later, the statue stops rocking, and a myrmekes will open the adamantine door in order to investigate. Garzoon’s trap cannot be reset.
S8: The Central Stair#
The central stair is not designed with humans in mind. Any creature smaller than a cyclops must treat the stairs as Difficult Terrain.
On each floor, there is a large horn. It takes an action to blow a horn. When a horn is blown, the sound carries all the way to the top of the tower. The tower’s inhabitants immediately move to “alert” status when the horn is sounded. See the table in The Inhabitants of Praxys section, above, for the various effects this can have on the tower’s denizens.
S9: The Bronze Molds#
This molding room is where the gorgons for the coming war effort are constructed. There are two Gygan Boxers directing nine Myrmekes Legionnaires (both in appendix B) to put the creatures together from molded parts. There are two Gorgons in here that are already operational.

The gygans and gorgons attack trespassers on sight. The myrmekes will stand aside as a group and watch the battle with cold curiosity. They will only fight to defend themselves if attacked. Once the gygans and gorgons are dead, the myrmekes will try to convince the heroes to free their queen.
The Portcullis. As a Bonus action, one gygan can pull a lever close to the forge. The lever seals the main door with an adamantine portcullis. The portcullis requires a combined Strength of 30 to lift. At your discretion, the sound of the portcullis may be loud enough to attract the attention of the Blemys (appendix B) in The Water Wheels (area S5). The blemys arrive as reinforcements 2 rounds later.
The Molten Trap. As an action, any Large-sized creature can pull a lever on the gorgon bull mold that hangs from the ceiling, causing the floor to flood with molten metal. Anyone standing more than 5 feet from a wall will be hit by the molten bronze. They must make a DC 15 Dexterity saving throw or take 36 (8d8) Fire damage (half damage on a successful save).
Window Ledges. There are windows in this chamber. One of the window ledges is the nest of a mated pair of
- Griffons. The griffons are not hostile, but they are protective of their nest.
S10: Golem Workshop#
This is the assembly shop for bronze automatons that will be used in Sydon’s armies.
A single Gygan supervises eight Myrmekes Legionnaires (both in appendix B) that are finishing the assembly of a bronze mechanical warrior on the central iron press. The bronze construct resembles a human-sized cyclops.
Assembly involves putting all of the needed pieces in their proper positions on the central iron press. The top part of the press then lowers into place and the parts are superheated. When the press opens, water flows over it, cooling the new mechanical warrior.
The finished versions are Bronze Automatons (appendix B). Four bronze automatons are currently operational and stand in a perfect parade line against the east wall.
The gygans and the four bronze automatons attack intruders while the myrmekes continue working at the press. The gygan will direct some of the bronze automatons to move onto the central press, hoping that the heroes will follow them. If at least one intruder is on the press, the gygan will pull a lever to activate it.
The Press. Anyone on the press must make a DC 15 Dexterity saving throw or be crushed by the press for 55 (10d10) Bludgeoning damage. Anyone who survives the damage is stuck in the machinery and must make a DC 20 Athletics check to escape. Anyone reduced to 0 Hit Points by the damage is crushed into bloody paste. Automatons on the press are crushed when it is activated, and they don’t recognize it as a threat.
Bronze Pipes. This room can be accessed via the network of bronze pipes that runs through the tower (see The Bronze Pipes, area S4). The pipes supply water to the press. Anyone entering the room from the pipes will stand up in 3 ft. of water in the water trough. Re-entering the pipes is easy to do from the trough.
S11: Myrmekes Queen#
The door to this room is locked, and it requires a DC 20 Dexterity check with Thieves’ Tools to open.
This is the prison where Sydon keeps the Myrmekes
- Queen (appendix B) locked away. The chains keep the queen Restrained, while the helmet keeps her from being able to utilize her Mental Blast or Redirect Attack actions. Both the chains and helmet can be removed by a hero who uses an action to make a successful DC 15 Dexterity check using Thieves’ Tools. Alternatively, a hero can break them with a successful DC 20 Strength (Athletics) check. By keeping her prisoner, Sydon keeps all of the
myrmekes in the tower loyal. Sydon has always been interested in the possibilities of the myrmekes race, but he is very wary of the damage that they could do to the world if one of their queens were to be set loose, backed by resentful followers.
The myrmekes queen imprisoned here is guarded by two Blemys cyclopes (appendix B). They are under orders to kill the queen if anyone breaks into the chamber. They will focus their attacks on the queen until she is dead and then turn their attacks on trespassers. The blemys are intelligent enough to turn their attacks on the party if they feel that their lives are in danger.
The Queen Lives. If the myrmekes queen lives, she will try to bargain for a way out of Praxys. She summons all of the myrmekes on the level to her. Then she offers one of her Myrmekes Legionnaires (appendix B) as a companion to each of the heroes in exchange for a clear path to freedom.
The Queen Dies. If the myrmekes queen is killed, then the rest of the myrmekes sink into a torpor and will not react to anything that happens around them, with two exceptions. Firstly, any hero who took part in killing the myrmekes queen will be marked by the scent of her death. Any myrmekes in the same area as a queen-slayer will attempt to kill the offender, even at the cost of its own life. All other enemies will be ignored. Secondly, the myrmekes will still defend themselves if attacked.
Letting the myrmekes queen leave the tower is a very bad idea. Refer to Titan’s Folly in The Cerulean Gulf chapter for details about the consequences. It could spell the eventual doom of all other intelligent races.
S12: Gygan Barracks#
This is where the gygans garrison lives when off duty. There are usually four Gygans (appendix B) asleep in this room at any time. Smaller, human-sized guests are given space here as well.
Treasure. Each chest contains the personal equipment for two gygans. Each has 4d20 GP and 8d20 SP.
S13: The Kitchens#
The chef is Ramsus (NE Satyr) who is assisted by 4
- Goatling Tricksters. The kitchen staff are not excited by the idea of fighting, and Ramsus has no great love for Sydon. He is willing to help the heroes, but the goatlings only want to cause mischief. Goatling Pranksters. The goatlings will hurl insults at the heroes in an attempt to enrage them. If they are threatened, they will use Mislead to turn invisible and make their escape. Then they will follow the heroes and use their Polymorph powers to turn the heroes’ enemies into giant crocodiles, woolly mammoths, or whatever other strange beasts they think are funny. Ramsus’s Plan. If the heroes persuade Ramsus to help them, he suggests the following plan. He will hide the heroes in a feast and send it to the top level of the tower. They will hide in giant-sized loaves of bread, and the gygans—who arrive within an hour—will use the elevator to take the food directly to the Throne Room (area S28). Dinner is Served. If the throne room is empty, then the heroes can wait until the gygans leave before breaking the bread and exploring. However, if the throne room is occupied by Sydon or his children, then the heroes might wish to stay hidden until the Titans leave. In this case, there is a 50% chance that one of the Titans will be hungry enough to break open the bread and reveal the heroes, much to their annoyed delight. Bronze Pipes. This room can be accessed via the network of bronze pipes that runs through the tower (see The Bronze Pipes, area S4). Only creatures of Tiny size can reach the kitchens. The pipes that feed the water into the kitchen are too small for larger creatures. The Portcullis. A lever in the kitchen activates an adamantine portcullis that seals off the room. Lifting the portcullis requires a combined Strength of 30. Ramsus will use it to divide intruders in the event of a battle.
S14: The Treasury#
This is where Garzoon (The Forge Room, area S1) keeps his secret treasure stash. The entrance is hidden in the southern wall of The Water Wheels (area S5).
Garzoon has fashioned a deadly trap in the secret hall that leads to the room. It is activated if anyone touches the door without saying the password (“Talieus”).
The two stone cyclops heads, one on the south side of the hall and one on the north, are part of the trap. The eyes in these heads watch whoever walks in. The door that leads to the treasury is made from adamantine and is locked. It requires a successful DC 20 Dexterity check using Thieves’ Tools to open.
Javelin Trap. The halls are lined with javelins: 40 in total. There is a tiny mechanical latch inside the door that triggers the hallway trap. If the door is opened slowly, a successful DC 20 Investigation check reveals the latch. A successful DC 15 Dexterity check is required to disarm the latch in time to stop the trap.
If the trap is triggered, then the two cyclops heads shoot a bolt of lightning that fills the hallway. Everyone
in the hall must make a DC 20 Dexterity saving throw or they take 35 (10d6) Lightning damage (half damage on a save). The lightning also electrifies all of the javelins.
Next, 1d4 javelins per person per round jump from the wall and fly towards their targets. The javelins have +10 to hit and each hit inflicts 3 (1d6) Piercing damage and 14 (4d6) Lightning damage. There are 40 javelins in total, and each can attack only once.
Disabling the Trap. There are ways to disable the trap before it triggers. Placing a blindfold over the cyclopes’ eyes will prevent the trap from triggering. If the javelins are tied down, removed from the room, or broken, then they won’t be capable of attacking.
Treasure. This is where Garzoon keeps everything that he’s most proud of creating, including masterwork items that he refused to surrender to Sydon.
The Quiver of Ehlonna hangs from one wall, and inside are three javelins of lightning. There is also a mannequin of a gygan, and each pair of its hands is wearing a different set of gloves: Gloves of Missile Snaring, Gloves of Swimming and Climbing, and Gauntlets of Ogre Power. Coins with a total value of 2,500 PP are heaped along the west wall. There are also three chests. One chest has two dozen pearls worth 100 GP each. The second chest has a dozen black pearls each worth 500 GP.
Chest of Beetles. The third chest has twelve miniature
- Barbed Devils inside. Each of the barbed devils is 6 inches tall and looks like a large humanoid beetle. When the chest is opened, they immediately begin climbing up the sides of the chest to escape. The heroes should roll for initiative. At initiative counts 12 through 1, a single barbed devil will reach the outside, grow to full size, and attack. Closing the chest will prevent any barbed devils still inside from escaping. If the lid is closed, the chest rattles violently for a moment and then grows still. Reopening the chest restarts the process.
The Heavens Locations#
The Heavens are where the greatest heroes of Thylea are summoned by Sydon to dwell forever. Time doesn’t move forward on this level, so anyone living here is effectively immortal. Great heroes of the centaurs, minotaurs, gygans, and other ancient races of Thylea exist on this level. Some are effectively more than a thousand years old, but for them, no time has passed since they arrived. The denizens of the Heavens are mostly oblivious to their detachment from the rest of Thylea, and they care little about the outside world.
The greatest aspiration of knights in the Order of Sydon is to be granted the honor of dwelling on this level of Praxys. The northern wall of this level connects to a demiplane of nearly endless beautiful fields, peaceful forestlands, clear streams, and picturesque mountains. Sydon is good to his most loyal servants.
S15: Sparring Chamber#
This is where great warriors test their mettle against one other. At almost any time of the day, two Minotaur
- Warriors and two Gygan Heroes (both in appendix B) can be found here. One minotaur and one gygan will be sparring in the central pit while the other pair watch and pass judgment. The sparring creatures have half their Hit Points remaining. All of them will attack trespassers on sight.
S16: Central Corridor#
This central corridor connects all of the chambers and rooms on this level. It is always patrolled by four Minotaur Warriors (appendix B) who intercept trespassers. There are carefully concealed wall triggers on each corner of the central corridor. These can be spotted with a passive Perception score of 15 or higher. When one of the triggers is pushed, it activates all of the scythe blade traps along the corridor at the places marked X.
Scythe Blade Traps. The minotaurs are clever enough to lure opponents into standing in these dangerous positions while their comrades activate the trap. At these points, five-foot-wide, razor-sharp, adamantine blades will shoot out at intervals of 2 feet. Anyone standing in the area when the blades deploy must make a DC 15 Dexterity saving throw or take 54 (12d8) Slashing damage (half damage on a successful save). Anyone reduced to 0 Hit Points is sliced into 1d4 chunks.
S17: The Elevator#
This elevator can be used to access the other two levels, The Forge (area S6) and The Throne (area S36). It is unguarded on this level. Refer to The Elevator (area S17) for details about how the elevator is powered and activated.
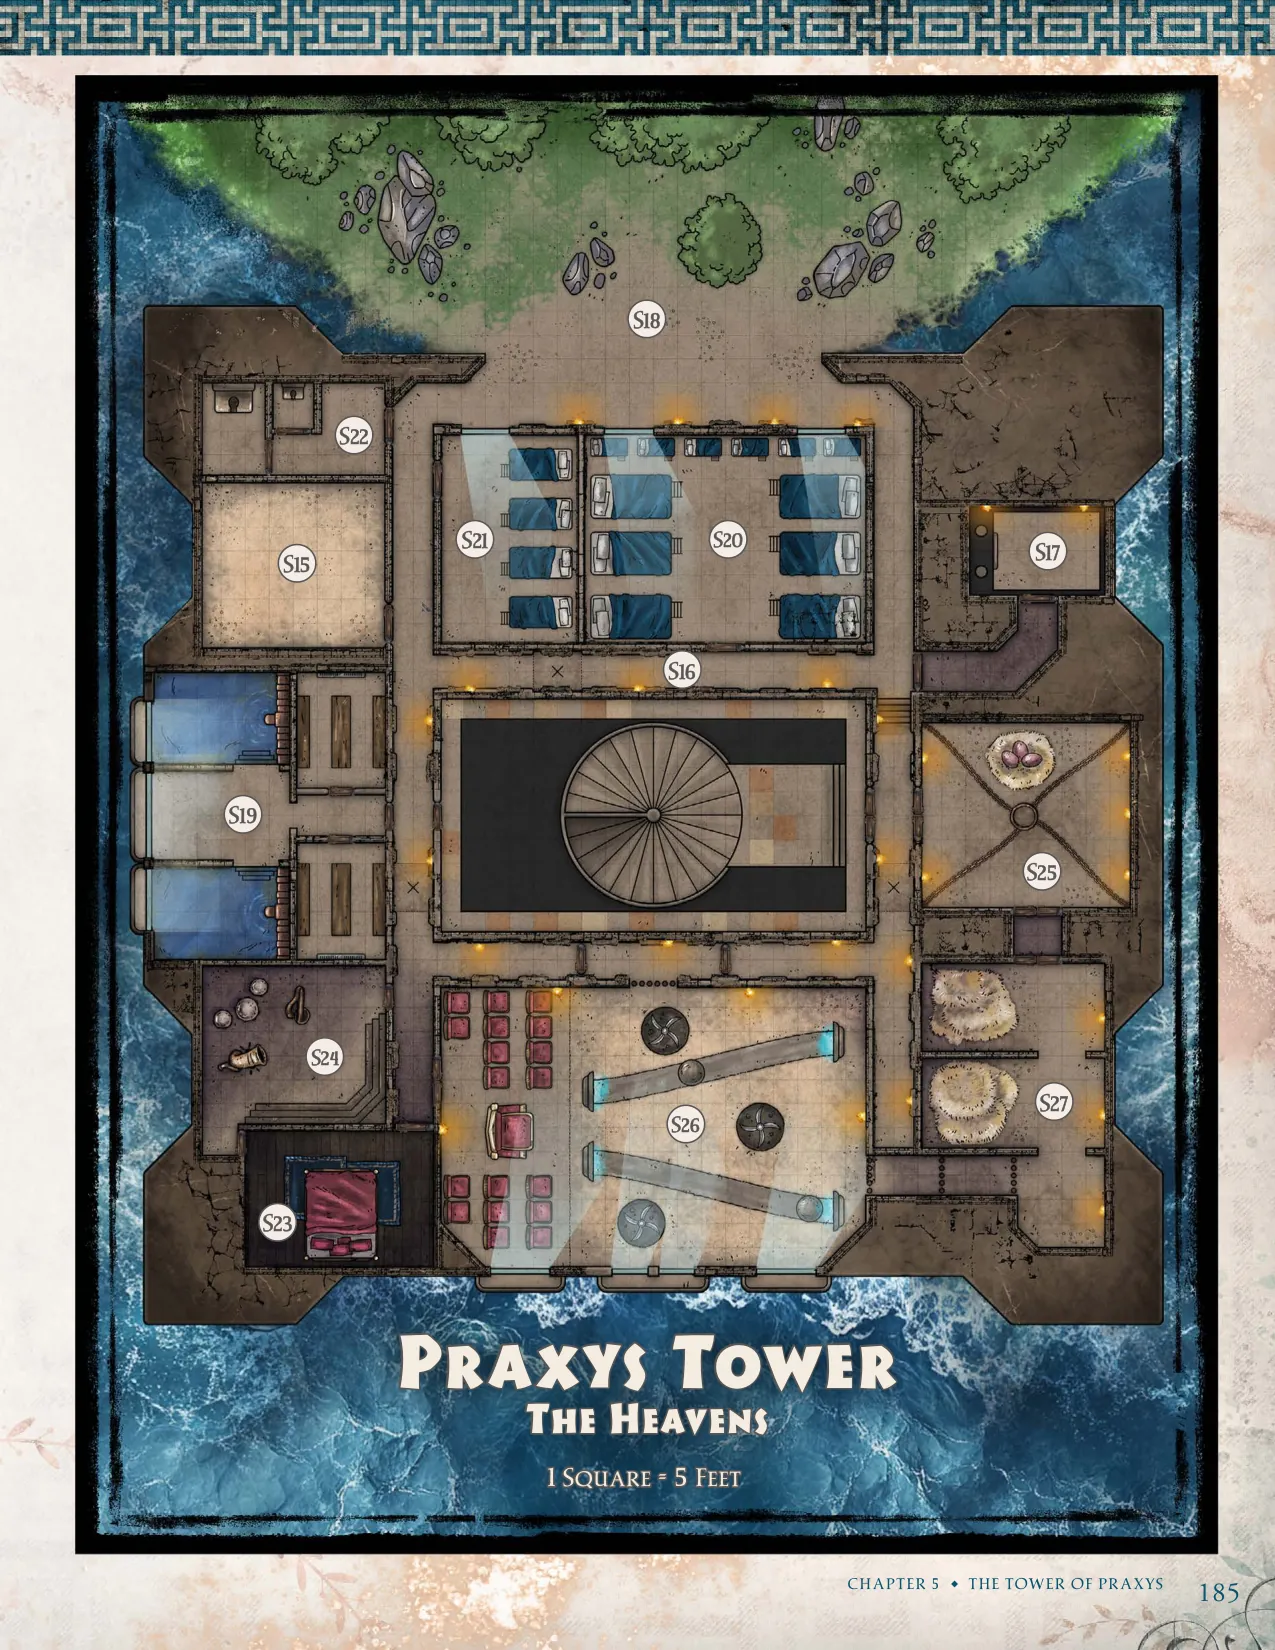
S18: Fields of Elysium#
The entire wall of this room is open to the demiplane of Elysium, which spreads out for miles in every direction and is beautiful beyond words.
Seductive Feeling. Heroes who enter the demiplane are overcome with a feeling of joy, and anyone who remains here for more than an hour must make a DC 10 Wisdom saving throw or else they refuse to leave. Characters who wish to stay will actively resist being removed. The party may be forced to lure them out by force or with magic. Once removed from the demiplane, the feeling of joy dissipates after 1 minute.
Birds And Beasts. The plane is populated by wild animals, including dangerous species such as wolves and bears. Most of these animals are larger and more majestic than their counterparts in Thylea or the outer world.
Despite the beauty and tranquility of these Elysian fields, they are dangerous for trespassers. When Sydon’s warriors discover trespassers here, they immediately engage them in battle. Possible encounters include:
A mob of twelve Centaur Heroes (appendix B) led by
one ancient centaur Druid roams the plains. Twelve Gygan Heroes (appendix B) compete in feats of
strength. Some wrestle, while others lift large weights. A pack of twelve Dire Wolves hunts at night; the heroes hear howling before the pack attacks them. A huge mother bear (Polar Bear with maximum Hit
Points) and her four cubs (Brown Bears) wander through the woods, searching for food. An Anarch Boar (appendix B)crashes through the tall
grass, pursued by twelve Lions and a majestic Golden Lion (appendix B). A White Stag (appendix B) runs through the woods,
pursued by a hunting band of five Minotaur Warriors (appendix B).
S19: The Baths#
Four male Gygan Heroes (appendix B) are bathing, while two female Gygan Heroes are getting dressed. None of the gygans have weapons or armor, so their Armor Class is reduced to 14. Their actions are replaced by the following:
If they are attacked, the gygans will try to retrieve the weapons and armor that they stashed in the Gygan Barracks (area S20). Two of them will act as rearguards so that the others have time to arm themselves.
Bronze Pipes. This room can be accessed via the network of bronze pipes that runs through the tower (see The Bronze Pipes, area S4). To enter the pipes from here, a successful DC 15 Strength check is required to open the valve that stops the water from flowing into the bath. The valve closes automatically unless it is propped open. If this is done, The Baths and the rest of the tower level will eventually become flooded, bringing attention to this room. Opening the valves from within the room only
requires someone to rotate a large bronze wheel beside each pipe. Anyone moving through the pipe that feeds the hot bath takes 10 (3d6) Fire damage from the magical heat that suffuses the last 5 ft. of the pipe.
Window Ledge. The windows here provide a beautiful view of the oceans. Five Griffons are perched on the window ledges at any given time. They will only attack if they are disturbed. They are accustomed to the loud noises made by the gygans during bathtime.
S20: Gygan Barracks#
The Gygan Barracks are richly appointed. There are six bunk beds in the room for the gygans and six bunk beds for human-sized guests. There are usually three Gygan
- Heroes (appendix B) sleeping in this room. The windows provide a view of the Fields of Elysium
(area S18). It is possible to climb through them, but this is a one-way trip, because the windows don’t exist on the other side. Heroes who climb through them arrive several miles from the usual entrance to the demiplane (area S18). Navigating back into the tower from here requires two successful DC 20 Wisdom (Survival) checks, and each attempt takes 1 hour.
If the windows are viewed from the other side (from the Fields of Elysium), the interior of the Gygan Barracks can be seen. However, it isn’t actually a window, it is a magical effect that makes the wall appear transparent.
S21: Minotaur Barracks#
There are four bunk beds in the room, and usually there are two Minotaur Warriors (appendix B) sleeping in here. As with the Gygan Barracks (area S20), the window looks out onto the demiplane of Elysium, and the same conditions apply to anyone who climbs through it.
S22: Waste Room#
This room smells unpleasant at best, even with the apparently tireless efforts of its caretaker. The Blemys (appendix B) has been given the task of keeping the place clean. It is a constant struggle, and he is very angry with everyone and everything. He will happily take out that anger on any intruder who disturbs him.
Flushing Toilets. The pipes from the toilets lead straight down to the waste pipe that empties into the ocean at the bottom of the tower. This is a possible escape route, but any character who attempts to use it must make a DC 10 Constitution saving throw or else they are too physically repulsed to enter, and they must have some kind of waterbreathing spell or item.
S23: Chamber of Love#
This chamber is furnished for a giant-sized king. An
Aurae Nymph (appendix B, The Great Labors) is singing softly while sitting on the edge of the bed. Talieus (NE
Young Hyperion, appendix B), one of Sydon’s children, is asleep in the bed, having been relaxed by her beautiful voice. The nymph does not want to fight the heroes or awaken her companion. She is in love with Talieus and does not want to see him harmed. With a successful DC 16 Persuasion check, the nymph can be convinced to keep him fast asleep for the next 24 hours. Awakening Talieus. If the heroes do wake Talieus, he
will fight his way out of the room to sound the alarm at the stairwell. He then races to the Throne Room (area S28). He will also bellow for help, attracting the attention of any nearby creatures on this level. The nymph will recklessly attack the first hero who harms Talieus.
Treasure. Talieus carries a silver key around his neck that can be used to unlock Nephele’s adamantine shackles in the Dragon’s Chamber (area S25).
S24: Chamber of Music#
Outraged at the interruption of their pleasures, the two
Gygan Heroes (appendix B) will immediately attack trespassers. Clever Musicians. When the gygans attack, the three
Satyr Minstrels (appendix B) continue to play music as if oblivious to the battle around them. In fact, they are using their music to disguise the magical assistance that they are providing to the gygans. If someone is suspicious of the minstrels, a passive Perception of 15 reveals that they are using spells. Otherwise, they appear to be lost in their music and unaware of their surroundings. Marble Statues. The statues look like they might be
marble golems, but in fact, they are ordinary statues.
Treasure. The satyrs’ instruments are carved from the bones of copper and bronze dragons (Nephele’s mates). The harp is worth 5,000 GP, the drums are worth 1,000 GP, and the horn is worth 7,500 GP.
S25: The Dragon’s Chamber#
Nephele (NE Adult Silver Dragon) is being kept prisoner here. Her chains are adamantine, but they can be unlocked with the silver key held by Talieus in the Chamber of Love (area S23). She is guarded and fed by two Gygan
- Heroes (appendix B), who attack trespassers on sight. Nephele is a clone from the flesh of the silver dragon
Balmytria, but she has been corrupted by the Titans. Balmytria’s soul never entered her flesh, and she never learned to speak. When she came of age, Sydon gave her a pair of bronze and copper dragons to mate with, and she produced a brood of evil metallic dragons for the Titan’s kennel. Her children include Icarus and Argyn, who were gifts from Sydon to Gaius and Acastus.
For most of her life, Nephele was free to roam the tower. But ten years ago, she grew bold and attempted to escape into the Forgotten Sea. Sydon prevented her, and she killed dozens of gygans in retaliation. As punishment, Sydon slaughtered her two mates and bound her here in chains. She nurses a powerful hatred for the Titan and craves vengeance above all else.
Nephele’s Shackles. The collar around the dragon’s neck is magical and nullifies Nephele’s ability to change shape. The chains are adamantine and enchanted with powerful magic. They have a damage threshold of 10, AC 23, and 50 HP. They can also be unlocked with the silver key that Talieus carries around his neck (area S23).
The Gifted One must decide whether to allow their grandmother to do this. If Kyrah or Pythor are present, they are not sure whether it is a good idea to allow this, but a silver dragon would help greatly in a battle against Sydon. They will support whatever decision the Gifted One makes.
If the Gifted One decides to allow their grandmother to possess the body of the dragon, read the following:
The possession succeeds, though the two minds strain to coexist within one form. The dragon soon assumes a humanoid shape echoing the grandmother’s likeness, silver-haired and fierce. She travels with the heroes, silent and watchful. She refuses to fight, until the moment she faces Sydon, when all restraint will shatter. See below for more details.
If the Gifted One is Not Present. When set free, Nephele will immediately polymorph into the form of one of the heroes, except with silver hair. She will follow the heroes, but she will not get involved in any fighting. She behaves like a stray cat, and she bonds to the first hero who offers her food.
Treasure. There are three dragon eggs in this room. Two of the dragon eggs are cold and dead, because they have been completely neglected. However, one of the dragon eggs is healthy, and if it is properly cared for, it will hatch a Silver Dragon Wyrmling in 1d6 days. If the Gifted One is present, their grandmother will encourage them to take the dragon egg.
S26: The Great Arena#
This large arena is used by Sydon and his children as entertainment. Prisoners are dumped in the arena to fight dragons for the amusement of Sydon, his children, and his many gygan, centaur, and minotaur servants. The prisoners also make excellent snacks for Sydon’s kennel of dragons (area S27). The room has several features that look deadly but are easily avoidable.
The Pit Traps. The three pits are each 10 feet wide and 30 feet deep. Scything blades constantly spin at the bottom of the pits. Creatures that fall in take 10 (3d6) Bludgeoning damage and 20 (6d6) Slashing damage on the first round. Creatures in the pit take 20 (6d6) Slashing damage every round until they escape.
The Iron Balls. There are two five-foot-wide curved paths that run from east to west, and iron balls roll along each path. One of the balls rolls east and the other rolls west. When the balls reach the end of their paths, they teleport back to their starting points. Moving across the path usually requires a DC 5 Dexterity check, but the DC is increased to 15 for creatures with a movement speed of 10 or less (or creatures affected by something like a slow spell). Failure results in 36 (8d8) Bludgeoning damage from one of the rolling balls.
Audience Chamber. An audience chamber on the west side of the arena allows a safe view of the action. The audience is protected by a permanent Wall of Force. Most of the seats are for Large-sized creatures, but the central throne is obviously made for a Huge-sized creature. The windows looking out on to the ocean in this room are also permanent Walls of Force. If the tower is on alert, then this room has been prepared as a trap for the heroes. Otherwise, it is empty.
Captured Prisoners. The arena has several naked prisoners chained to the stake in the middle of the room. These prisoners could be Ultros crew members or other characters who are important to the heroes, including people who should be back on the mainland. If none of those characters are appropriate, then the prisoners are naiad nymphs who have displeased Sydon. The stakes and manacles are made of adamantine.
Springing the Trap. The door that leads to the audience chamber is locked and barred with Arcane Lock. The audience chamber is covered in a Darkness spell and a curtain as well (which blocks the view for those who can see through magical darkness). Inside the audience chamber is Sydon’s son, Talieus, (NE Young Hyperion, appendix B), and a half-dozen Goatlings Tricksters (appendix B, The Great Labors).
Talieus waits until some of the heroes have entered the arena, and then he drops an adamantine portcullis and a wall of force at each of the doors in the hallway outside the room entrance. The portcullis over the entrance is a ruse—it’s only there for decoration. The Darkness spell vanishes, the curtain falls, and the audience is revealed, laughing and joking about the doom that awaits everyone trapped inside the arena.
The Young Bronze Dragon, Young Silver Dragon, and
- Young Copper Dragons try to kill everyone in the arena. The bronze dragon uses its Repulsion Breath to force victims into the pits. The copper dragon uses its Slowing Breath on creatures to make the iron balls more dangerous. Any creature paralyzed by the silver dragon’s breath attack can be pushed into a pit—or into the path of one of the rolling balls. Talieus and the chorus of goatlings laugh mercilessly during the fight, mocking the heroes whenever anything bad happens to them. Surviving the Arena. If the heroes manage to defeat the dragons, Talieus flies into a rage and kills several of the goatlings in the viewing chamber. He then proclaims that he will make the heroes suffer for killing his pets. He continues to make threats as he puts on the ornate armor hanging on the wall. This takes 1d6 rounds, giving the heroes some time to recover from the dragon fight. When Talieus is ready, he pulls the lever that returns the room to its original state and turns off the Wall of Force that separates the arena from the viewing room. He fights to the death.
S27: The Dragon Stables#
A Young Bronze Dragon, Young Silver Dragon, and
- Young Copper Dragon are kept here. They are hostile to everyone except their gygan keepers and the hyperions. The stables are empty if the heroes have already battled the dragons in The Great Arena (area S26). The two double doors that connect to The Dragon’s
Chamber (area S25) are made from adamantine and are both locked. They can be opened with a successful DC 25 Dexterity check using Thieves’ Tools. Smash Trap. A pressure plate between the two double doors triggers a trap (DC 20 passive Perception to notice the plates). The trap is a massive 10 ft. cube stone block that drops between the doors and blocks access. Anyone under the stone block must make a DC 15 Dexterity saving throw or they take 35 (10d6) Bludgeoning damage (half damage on save). Anyone reduced to 0 Hit Points by this damage is reduced to a bloody paste. Otherwise, they are shoved into one of the adjoining rooms.
The Throne Locations#
The Throne level of Praxys is the dwelling place of Sydon, Lord of Storms. From this level he watches over faraway places and even other planes of existence using magical scrying pools, telescopes, and other instruments. The children of Sydon and Lutheria spend most of their time on this level, learning from Sydon and preparing to take on the mantles of godhood from the Five. The children are named after the brothers and sisters that Sydon and Lutheria betrayed millennia ago: Talieus, Hergeron, Chalcia, Goloron and Yala. All of their children are
- Young Hyperions. The whole level is also a museum and gallery. Sydon
keeps trophies from his triumphs here—a measure of his vainglorious love for himself—and artifacts of great power. This self-aggrandizement continues with the many statues of Sydon, showing him in all kinds of flattering ways: as a warrior, a judge, a philosopher, a father, a king, a giver of wisdom, a singer of songs, and a mighty hunter. Beautiful murals depict the history of Sydon and Lutheria in the most flattering light possible. Sydon is a boastful creature who has no qualms celebrating his own greatness.
S28: Throne Room#
Sydon’s favored daughter Chalcia (NE Young Hyperion, appendix B) is usually here, attending to matters in her father’s absence. Sydon has spoiled her quite badly. She is easily bored and has no interest in the heroes, even if the tower is on high alert. She is attended by a harem of twelve beautiful men (NE Nobles) who desperately try to entertain her. If the heroes explore this room before Sydon returns, then she may engage them in conversation out of idle curiosity, but she won’t attack them unprovoked unless ordered to do so by her father.
The World Map. The map on the floor is more than just a perfect representation of the continent of Thylea. Sydon can use it to teleport to any location on the continent, and anyone with a Teleport spell can use the map in the same manner. If you wish, this can be Sydon’s escape route if he is losing a battle against the heroes, especially if you want him to appear in the Battle of Mytros.
The Windows. The windows in this room are permanent Walls of Force which cannot be dispelled.
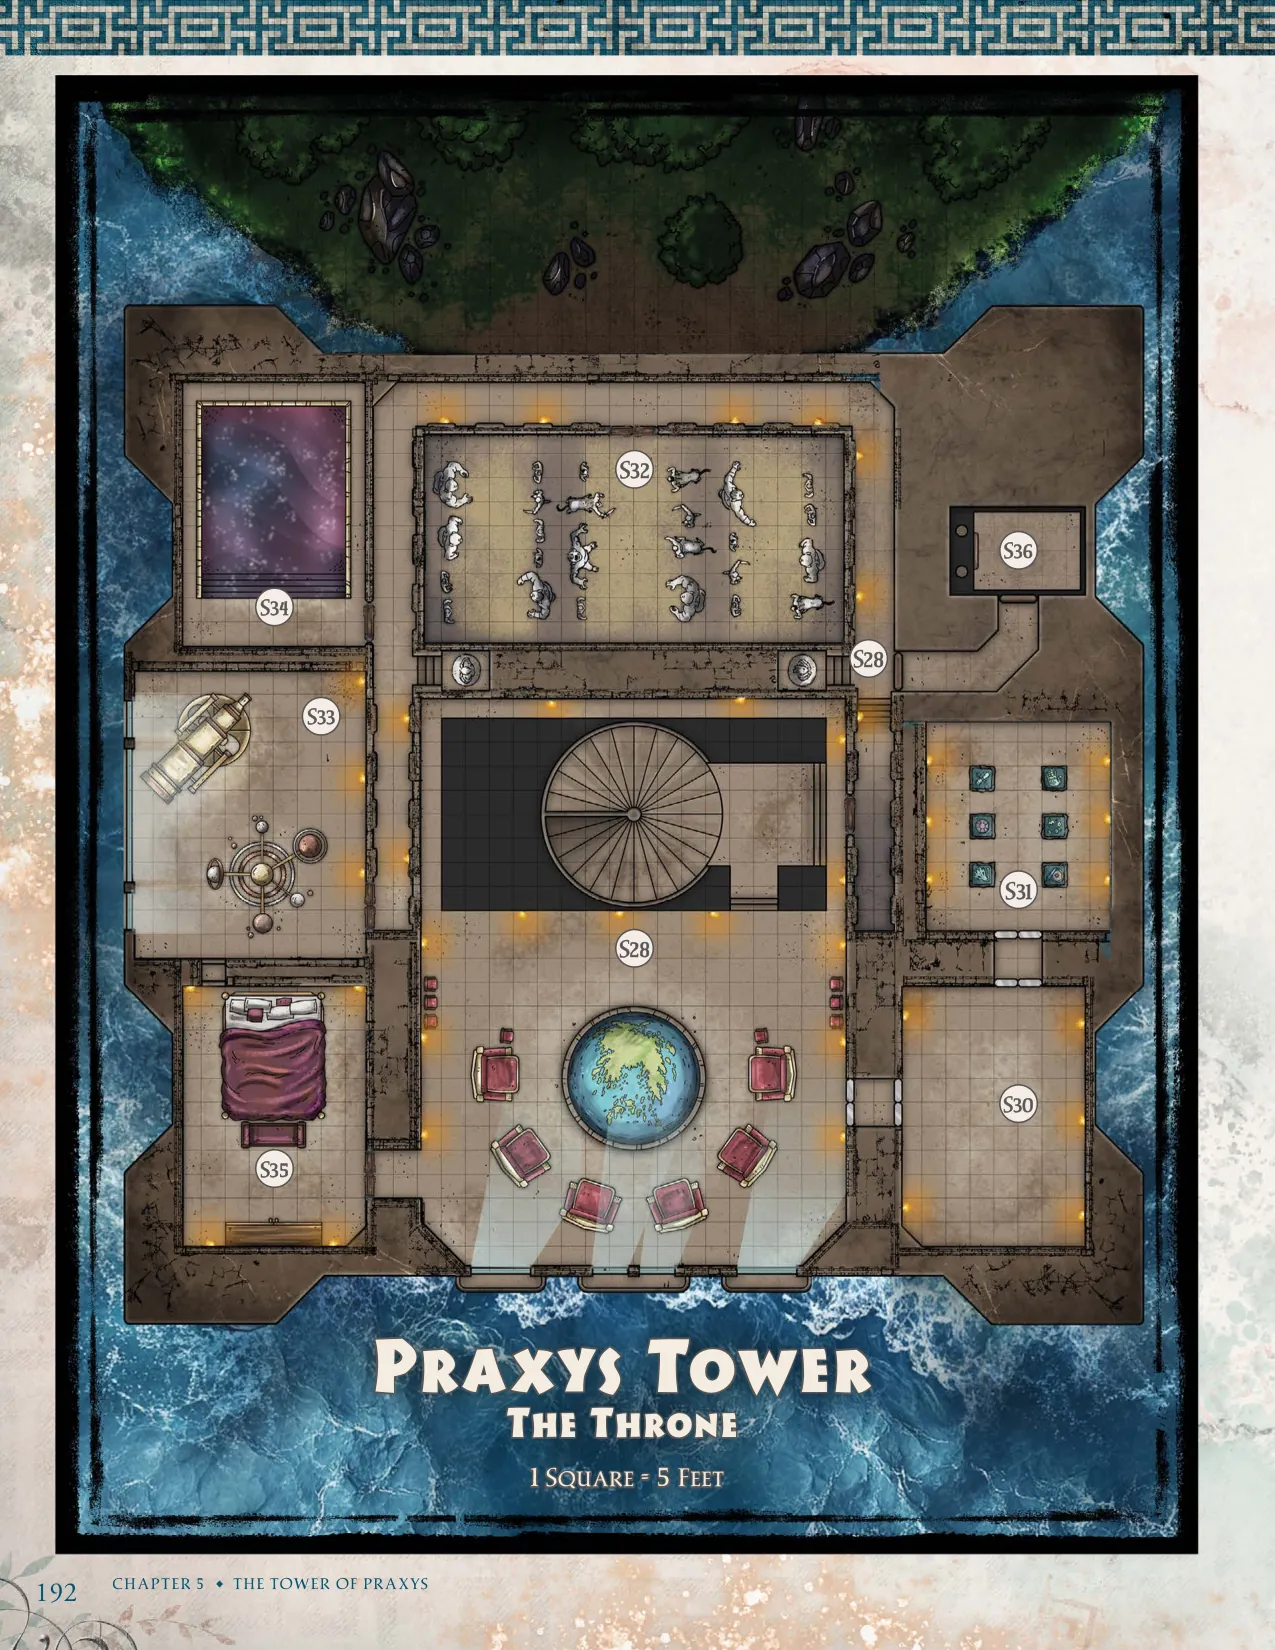
S29: Main Hall#
This hall runs along the eastern, western, and northern sides of the level. On the east and the west are a pair of nooks, holding iron statues of Sydon. These two Iron
- Golems are usually inactive, but they animate when commanded by Sydon or one of his children. They also activate if the alert is sounded in the tower, or when someone exits the Elevator (area S36) without using the proper pass phrase.
S30: The Vault Entrance#
The two sets of adamantine double doors that lead into this room are locked. Picking the lock requires a successful DC 25 Dexterity check with Thieves’ Tools. Without tools or the Knock spell, it is almost impossible to open these indestructible doors.
This chamber is guarded by a fully-grown Cerberus (appendix B); treat this area as its lair. The creature attacks anyone who steps into the chamber—but not before taunting them with promises of the treasures hidden within the vault, which it takes great pride in protecting.
S31: The Vault#
The two sets of adamantine double doors that lead into the vault are also locked. Picking the lock requires a successful DC 25 Dexterity check with Thieves’ Tools. Otherwise, the knock spell must be used on each door. Sydon’s greatest treasures are on display here, although the only creature normally allowed inside is the Titan himself. Each artifact rests inside a glass case on top of a marble pillar. There are no traps, tricks, or secrets here, because Sydon does not believe anyone could possibly reach them. Reaching the objects is as simple as opening each case, but you do not need to tell your players that—let them worry a little.
Shadowy Helm: This Helm of Darkness (appendix C) was forged centuries ago and fitted for a giant-sized creature. However, it automatically shrinks or expands to fit anyone who attunes to it.
Balmytria’s Skull: This massive, impressive dragon skull is missing one of its horns. It has no inherent value, but the gods grant a Wish spell to anyone who treats the skull with proper reverence by immolating it in a funeral pyre or by returning it to its rightful tomb.
Ruby Gate: This is a huge, magically imbued ruby that works in the same fashion as a Cubic Gate.
Scroll of the Pact: This scroll documents the original pact forged between Mytros, Sydon, and Lutheria. Libraries and scholars across Thylea would give anything in exchange for a chance to study the scroll.
Gauntlet of Power: Sydon tried to use this item and broke it in frustration when it didn’t work for him. The four gems embedded in it are a sapphire, a ruby, a diamond, and an emerald, and each is worth 5,000 GP.
Holy Sword and Shield: This beautifully forged pair of items includes a Holy Avenger short sword and a Spell Guard Shield made for a human-sized warrior.
S32: Hall of Fallen Heroes#
The statues are the petrified remains of those who have displeased Sydon, all carefully lined up in ranks. They are,
in effect, another of Sydon’s trophy galleries. A Euryale medusa guards the statues. She remains hidden and ambushes trespassers in her lair, unless she is summoned to the Throne Room (area S28) by Chalcia.
S33: Room of Far Sight#
This room is the sanctuary of the Furies, but their presence is not immediately obvious. They stand utterly still, gazing out of the western window. Heroes with a passive Perception score of 16 or higher notice them first. Eventually, they reveal themselves.
The Furies. Alecto, Megaera, and Tisiphone (LN
- Erinyes) are called “the Furies,” and they are the queens of the erinyes. They gather in this chamber to discuss how vengeance should be exacted in accordance with the customs and laws of Thylea. As long as the heroes have not broken an oath or violate the rules of Guest Friendship (appendix D, The Great Labors), the Furies treat them with a politeness verging on indifference. They are not particularly interested in the heroes, but they do not wish them any harm. Oathbreakers. If any of the heroes is an oathbreaker,
the Furies will be enraged by their presence. Any character who has suffered the Curse of the Treacherous (appendix D, The Great Labors) is an affront to them, and becomes an instant target. The Furies will attack relentlessly, ignoring everyone else until the offender is unconscious. Unlike their daughters, the Furies do not attempt to capture oathbreakers. They simply nail them to the tower walls and let harpies and griffons tear them apart.
Wisdom of the Furies. The Furies have no love for Sydon, and they have no loyalty to him. They are willing to advise anyone who asks for help in defeating the Titan. All they ask in return is fair payment, such as a magical item. The item must be rare or better. If suitably paid, the Furies will reveal several useful bits of information to the heroes:
“Jamming the gears that move the planets will grant
those nearby valuable time.” “The ancient red star is only minutes from death, but
time doesn’t pass in the astral sea. The star can be lured to the mortal world to destroy the tower with the light of its younger love.” “Sydon has made a mockery of both dragons and
gods. Nephele should be allowed to have her vengeance.”
The Telescope. The huge magical telescope allows anyone using it to see any faraway place, even other
worlds and other planes of existence. All the viewer needs to do is think of a place that they have already visited (or a person that they know). The telescope will act as a Scrying spell, immediately showing them that person or place.
Unlike a Scrying spell, the telescope can see beyond the Prime Material Plane, into other planes of existence. It is used by the Furies to spy upon all of mortal kind; the Furies have been everywhere in the multiverse, and there are no limits to what they can see.
The Orrery. This artifact was made by Sydon and the sphinxes from the Island of Time. It is a perfect representation of all the worlds in the solar system with the sun at the very center. The mechanism has a clever arrangement of gears and pivots that moves the planets around the sun, moves the moons around the planets, and spins all of the planetary bodies on their axes.
The orrery shows exactly where all of the planets and moons are in the solar system at the present moment in time. Sydon intended to use the machine to travel through time, but it never worked as intended. As far as he is concerned, it’s just a magnificent toy.
Stopping Time. Jamming the gears of the orrery produces an effect similar to a Time Stop spell. The Time Stop allows anyone within 10 ft. of the orrery to act as normal, as if they were the caster of the Time Stop spell. Once the Time Stop ends, the orrery breaks down and can only be repaired with the aid of a sphinx. To jam the orrery, a magical weapon must be used. Anything non-magical just breaks when thrust into the gears.
The Windows. The windows in this room are permanent Walls of Force which cannot be dispelled.
S34: Hall of Travel#
The pool is a gateway that allows anyone who steps into it to travel to the Astral Plane. Any creature who walks into the pool will be swallowed by the liquid. Once submerged, they will find themselves in a vast ocean of silver lights, with the pool’s surface overhead. The lights are millions of stars. One can easily return to the tower by “swimming” up to the pool’s surface.
The Dying Star. Floating nearby is a radiant crimson sphere, an ancient star, a few hours—or perhaps minutes—from death. It radiates a faint heat, like a warm breeze against the skin. Sydon keeps this star on the Astral Plane, where time does not pass. He suspects that allowing the star to die will unleash a burst of primordial magic, and he seeks to keep the star in stasis until he understands how to harness such immense power. The star is intelligent, but it is an utterly alien and incomprehensible life form.
Luring the Star. The star can be lured out of the Astral Plane. A torch lit from the fires of the Fallen Star (area S37) will attract the star. It follows anyone who carries such a torch out of the Astral Plane and into the tower. Despite apparent problems with its size, the red star passes through the pool without issue. If the party needs a clue for this puzzle, you may choose to have one hero experience a vision of a torch being held aloft from the highest point of Praxys.
The Star’s Death. Once on the material plane, the star lives for 1d10 minutes before dying. As it does so, it shrinks, grows dimmer, and explodes into blinding light. Anyone within 10 feet of the star when it explodes receives the benefit of the Foresight spell for 8 hours, thanks to the star’s primordial magic.
If the heroes are rash enough to travel further into the Astral Plane, they must make a DC 10 Wisdom (Survival) check every other round or lose track of where the pool is located. The Astral Plane is beyond the scope of this book, but any character lost on the plane does not age and could be rescued much later in the campaign.
S35: Chamber of Sydon#
Sydon’s Journal. Sydon keeps records of his proudest achievements the journal. Some notable entries include:
Talieus. “My son Talieus is a fool and a braggart. He’s much too proud of his own accomplishments, and they are few indeed. He is unfit for the throne.”
Hergeron. “My son Hergeron is unlike his namesake. He is cunning and clever and good with numbers. I shall need his sharp mind to manage my armies.”
Goloron. “My son Goloron bears a strong resemblance to his mother. He seems to have inherited her madness. I shall have to keep a close watch on him.”
Versi. “My daughter Versi infuriates me! She is always disobedient, and she loves her mortal pets too much. But I am pleased that she bears the gift of prophecy.”
Yala. “My daughter Yala is the strongest warrior among my children. She fights at the head of my armies. Mortals shall flee in terror before her wrathful temper.”
Chalcia. “My daughter Chalcia is blessed with all of my greatest qualities. She is headstrong and stubborn, but I believe that she will make a worthy successor.” Treasure. Other than a few trinkets worth 1,000 GP
in total, there is little else of interest here. Sydon delights in the attention and worship of his servants. He sees little reason to spend time on his own.
S36: Elevator#
The elevator doors on this floor are locked and cannot be opened except by magic. A single Knock spell will weaken the age-old magic that seals the doors. Three Knock spells in a row will allow the doors to be opened.
Pass Phrase. The doors will open if Sydon or one of his children wishes to use the elevator—or if the correct pass phrase is spoken. The phrase must be spoken in the giant tongue. The phrase is:
S37: The Fallen Star#
At the very top of his tower, Sydon has imprisoned his most valued treasure—a star that fell from the heavens ages ago. The star is the source of the roving light at the peak of the tower. It radiates an intense heat, and anything coming within 10 feet of it will catch fire.
Creatures that come too close take 6d6 Fire damage per round as long as they remain near. It is possible to ignite a torch using this heat, but the person who does so will take 1d6 Fire damage in the process. The star’s “flames” are silver and radiate magic.
The star is, like its companion on the Astral Plane, utterly alien and incomprehensible. It was bound to the tower by ancient magic. Sydon has forgotten how this was accomplished, but he knows that a Wish spell will free it from its long imprisonment.
Freeing the Star. Freeing the star causes the tower to shake and collapse. The process is irrevocable once started, and the amount of time it takes is up to you as the GM. The heroes should feel that they are in imminent danger as they try to escape, and they should make regular saving throws as they dash or fly to safety. However, the star will protect the party as the tower collapses: gratitude is a universal concept. In this case, the heroes may have to battle Sydon or Chalcia in the collapsed ruins of his Throne Room (area S28).