The Final Confrontation#
Once the Nether Titans have been defeated, the heroes must move against the villains who orchestrated the Apokalypsis. They can move against the villains earlier if they want to, but this might cause their cities to suffer additional destruction. The heroes can use divination magic to learn who is behind the Apokalypsis and where they are located. They will discover that Lutheria and the Hyperions have constructed a new palace on the tallest mountain in Thylea. Divination spells may also reveal the strengths, weaknesses, and lair defenses of their enemies. Using the spell Legend Lore reveals the names and religious domains of each of the Hyperions. This can also be accomplished with a successful DC 20 Wisdom (Religion) check.
Defeating the Hyperions#
When battling the Hyperions, the heroes may find the following tactics effective:
Weaknesses. Charm magic is effective.
Notable Attributes. Hyperions can see through all illusions.
Immunities. Hyperions can only be damaged with magical weapons.
Useful Spells. A Befuddlement spell can shatter even the powerful mind of a Hyperion.
Palace Grounds#
The Palace of the Hyperions is a wonder of divine architecture, a temple-fortress raised by the hyperions and Lutheria. It is carved into the heart of a mountain and spills out into gardens of immortal beauty. From this seat of impossible grandeur, the hyperions debate the fate of Thylea, indulge in celestial pleasures and forge divine artifacts. The palace is shaped from marble and granite, and it has been decorated with countless statues of the Hyperions. The statues are painted so that they are remarkably lifelike in appearance.
Storm Giant Guardians#
- Storm Giants patrol the slopes of the mountain where the palace is built. They travel in pairs. If the heroes make no attempt to be stealthy, then they
are attacked by one of the storm giant pairs.
Children of Lutheria and Sydon#
Lutheria has orchestrated the deaths of several of the Sunken Kingdom’s hyperions, replacing them with her own loyal children. Which of her offspring are present in the palace depends on who has survived; any slain by the heroes are absent. Refer to the Children of Lutheria and Sydon table.
To Lutheria, even her children are tools. When the moment comes, she will sacrifice them without hesitation to fuel the Apocalypse Stone.
Palace General Features#
Ceilings. All of the ceilings in the palace are 30 ft. in height.
Doors. All exterior doors to the palace are adamantine and locked with AC 20 and HP 120. It requires 1 minute and a successful DC 20 Dexterity (Sleight of Hand) check to pick the lock of these doors using Thieves’ Tools. The doors can be broken from their stone frames with a successful DC 25 Strength (Athletics) check.
Protection. The palace has been protected with powerful spells. All of the spells have been cast at level 9, and they require a DC 19 dispel magic to negate. The spells include the following:
Private Sanctum makes the interior of the lair itself
immune to divination magic of any sort. It also makes it impossible for creatures to teleport in or out. Forbiddance protects against teleportation, ethereal or
astral creatures, and celestials, elementals, fey, fiends, and undead. All windows are permanent Walls of Force.
All rooms are lit by Continual Flame spells.
Symbol has been used to create traps throughout the
palace. All of the symbol spells will trigger if someone other than a hyperion, or Lutheria approaches within 5 feet of it. The saving throw for the Symbol spells is DC 23. If a Symbol is triggered, roll 1d6. On a roll of 4–6, the closest hyperion was alerted and goes to investigate.


Hyperions#
All surviving hyperions are present at the palace, as well as any of Lutheria and Sydon’s children that may have replaced some of them. Below is an overview of where each can be found and their current state of mind (refer to appendix B for all Hyperion stat blocks in this section):
Sun Goddess. (Hyperion) Brilliant and exacting, Kalydessa, the Sun Goddess, believes herself the rightful queen of the new pantheon. See area W16a, the Chamber of the Sun Goddess.
Sky Father. (Hyperion) Vain and glory hungry, Thalakron constantly seeks praise. See area W18, the Vineyards.
Lord of Ghosts. (Hyperion) Once the chief judge of the Gygan Empire, Casius, the Lord of Ghosts, has been twisted and insane. See area W8, the Pit of Death.
Great Hunter. (Young Hyperion) Haunted by an unfinished hunt, Lonsharon, the Great Hunter, trusts very little, least of all Lutheria. See area W16b, Chamber of the Great Hunter.
Moon Maiden. (Young Hyperion) Vania, the Moon Maiden, is ruled by memory of feeling rather than fact. She often lingers with the Vile Trickster. See area W12, the Pleasure Chambers.
Fire King. (Young Hyperion) The Fire King, Kraggor, is consumed by an obsession with perfection, and much effort reforging his own scarred body. See area W7, the Hyperion Forge.
Fish Queen. (Young Hyperion) An exiled merfolk queen named Melidora who surrounds herself with those who have nowhere else to belong. See area W20, the Hyperion Pool.
Vile Trickster. (Young Hyperion) A satyr named Bryccos who now speaks only in unsettling truths. He revels in pleasure and mischief, often seen entertaining the Moon Maiden. See area W12, the Pleasure Chambers.
Children of Sydon and Lutheria#
Talieus. (Young Hyperion) Loud, impulsive, and obsessed with glory. He declares victory before battles begin and always leads the charge. W16b: Chamber of the Great Hunter.
Hergeron. (Young Hyperion) Hergeron is lean and pale, wearing dark blue robes patterned with shifting symbols that resemble ocean waves. See area W20, the Hyperion Pool.
Goloron. (Hyperion). Gaunt and hollow-eyed, Goloron is unpredictable and mentally unstable. He is the favored child of Lutheria, who has elevated his power above the others. See area W8, the Pit of Death.
Yala. (Hyperion). Yala is heavily built and covered in scars shaped like lightning. She is extremely aggressive and Lutheria has also increased her power, making her even more dangerous. See area W18, the Vineyards.
Chalcia. (Hyperion). Chalcia speaks with authority that demands obedience. She is the most capable leader among her siblings. See area W16a, the Chamber of the Sun Goddess.
Mistress of Death#
- Lutheria (appendix A) is not present when the heroes first arrive at the palace. She has passed through the Planar Window (area W9), journeying into the desolate Yoten realm known as the Lost Lands. There, she walks among the hungering giants. She has been whispering promises, forging pacts, and gathering them to the site where the Apokalypsis Stone (appendix C) will tear open the veil between worlds. Lutheria’s Return. Once the heroes have defeated three
of the hyperions, Lutheria returns. She steps through the shimmering Planar Window, returning from the Lost Lands to Thylea. She will then immediately teleport to the Apokalypsis Stone (area W21), where the final phase of her plan begins.
Palace Locations#
W1: Outer Doors#
The main doors are the only doors to the palace that are unlocked. The doors swing open if a creature comes within 20 feet of them.
W2: Entrance Hall#
There are eight statues, one for each hyperion. A bronze plaque above each of the bowls names the hyperion the statue represents in Common. Each of these statues is a
- Stone Golem with a Speed of 0 and does not have the Slow Bonus Action. Each of these golems has a Bonus Action as described on the Statue Offering table below. The golems appear inert and start with the Incapacitated condition until damaged or a creature touches the doors that lead to the Grand Hall (area W3). When one of these events occurs, the golem will lose its Incapacitated condition and attack any non-hyperion creature it can see. The golem will remain active for one hour. If the door is touched, all statues that haven’t been given
the appropriate offering will lose their Incapacitated condition. The appropriate offering may be placed in the bronze bowl at the foot of a statue and is described in the Statue Offerings table. The offering is not obvious, though the appropriate divination spell can reveal what it must be.
W3: Grand Hall#
The mounted heads are from some of the recent hunts that the hyperions have gone out on. They have successfully hunted chimera, hydra, wyverns, and even dragons.
A successful DC 15 Wisdom (Insight) check makes it obvious that the hyperions have a lot of pride in the trophies. Perhaps reminding the Titans that the heroes have hunted much deadlier creatures might be a way to enrage them.
W4: Throne Room#
This is where the hyperions gather to debate issues. Much like Sydon’s throne room in Praxys, a huge map of Thylea dominates the center of the room. Two Storm Giants stand guard in this chamber. They attack intruders and fight to the death.
Each of the thrones is enchanted with a Symbol (Death) that triggers if someone other than the appropriate hyperion sits in it.
W5: Pool#
The water of the pool is cool, but soothing. Once every 24 hours a creature can immerse itself in the pool and gain the benefit of a Short Rest.
The pool descends 100 feet before becoming horizontal and coming up at the bottom of the lake (area W20). It is used by the Fish Queen whenever she wants to enter the palace.
If anyone other than the Fish Queen uses the underwater tunnel, a Serpens senses it and swims into the tunnel to attack within a single round. The serpens fights to the death.

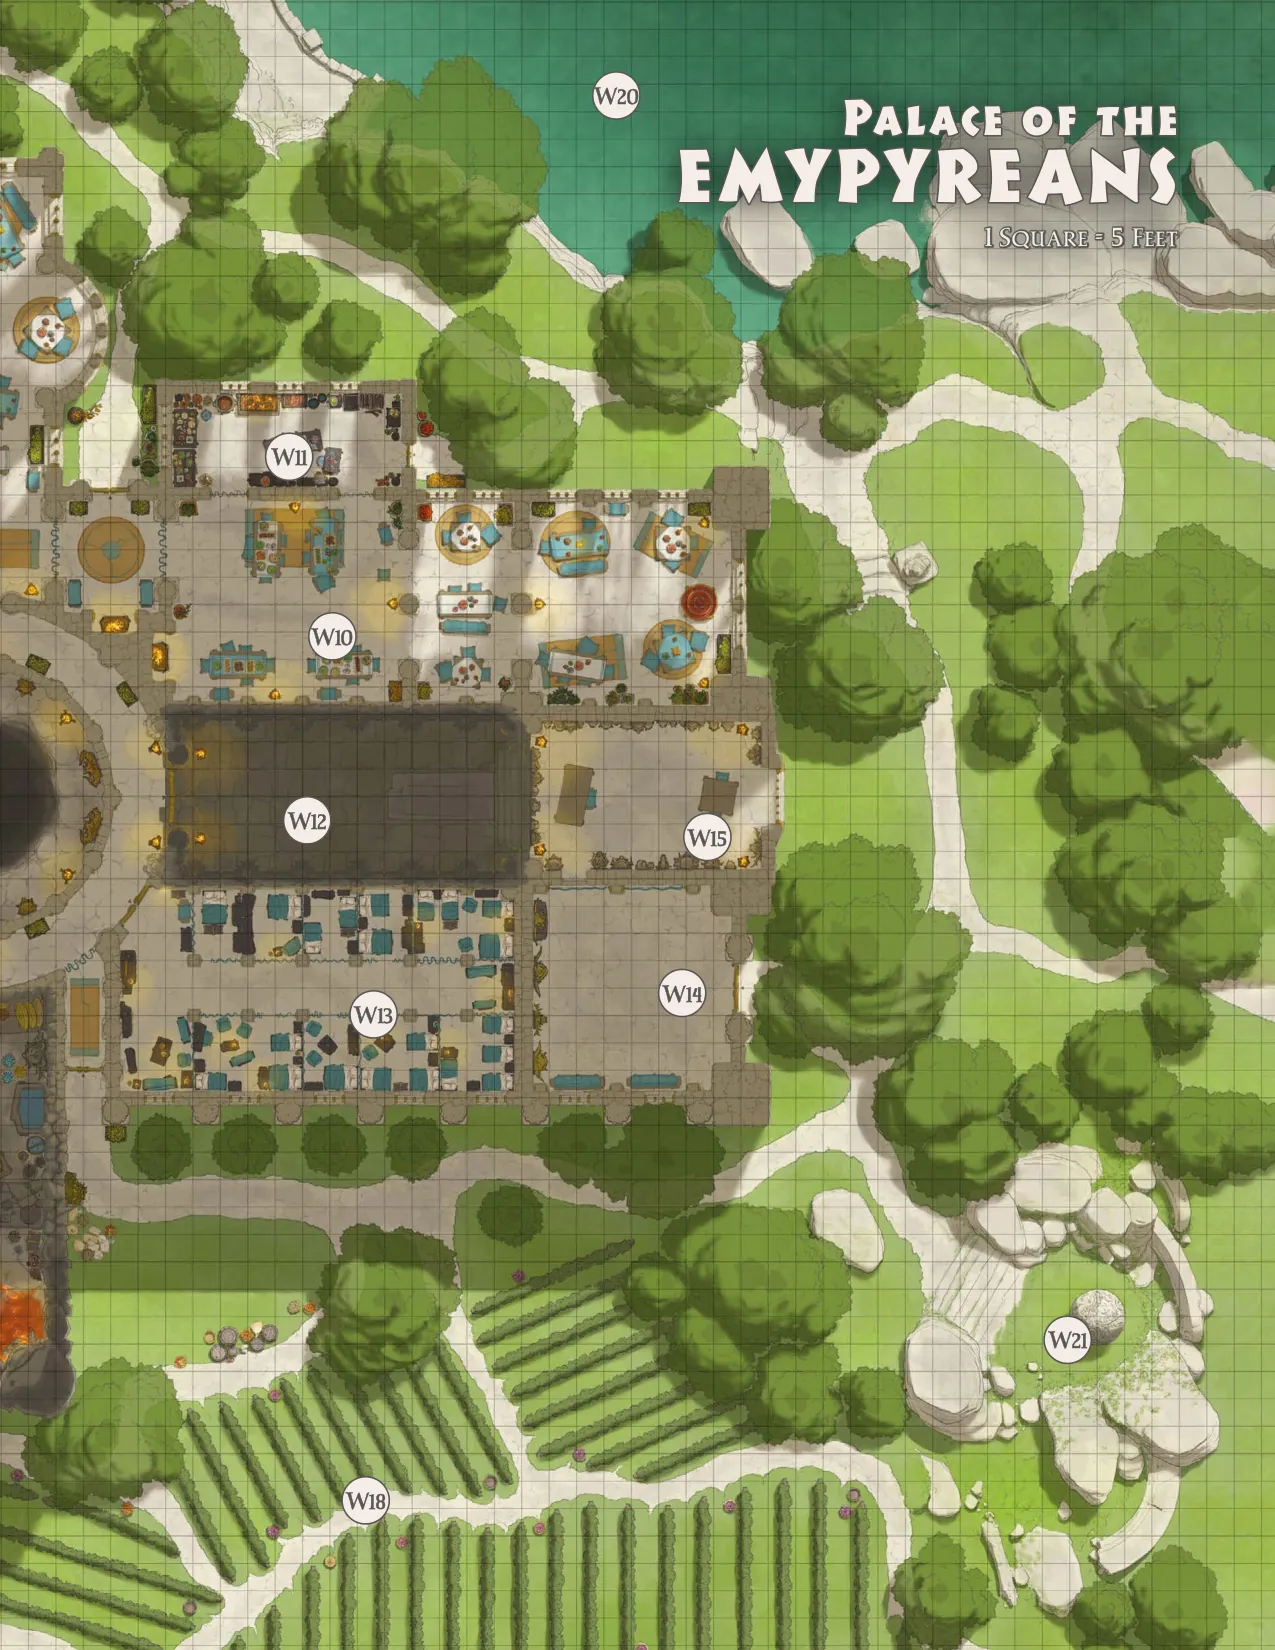
W6: Stairwell#
This stairwell leads up to the chambers of the Sun Goddess, Great Hunter, Moon Maiden, Fire King, and Vile Trickster.
Ten feet up the stairs is a Symbol (Pain).
W7: Hyperion Forge#
The cyclops working the forge is the Fire King (Young
Hyperion, appendix B). His fire seared skin is a map of overlapping scars and metal splints, each marking some part of himself he has broken and reforged in pursuit of a more “true” form. Working with him is a female Storm
Giant who serves as his apprentice. She has Immunity to Fire damage. If they take notice of the heroes, they attack. The storm giant fights to the death, but if the Fire King is Bloodied, then he will retreat to the Apokalypsis Stone (area W21). The Fire King can use a Bonus action to have the cyclopean face spew magma in a 60-foot cone starting at the center of the back wall. Each creature in the Cone must succeed on a DC 18 Dexterity saving throw, taking 99 (18d10) Fire damage on a failed save or half as much damage on a successful one. All the tools are sized for titan sized humanoids and cannot even be lifted without a 24 Strength score. Treasure. There are two human sized chests in the room. Both are locked and require 1 minute and a successful DC 20 Dexterity (Sleight of Hand) check to pick the lock using Thieves’ Tools. The chests can be broken open with a successful DC 25 Strength (Athletics) check. A Symbol (Pain) has been inscribed on both chests. Inside the first chest is Dwarven Plate (plate armor), Armor +3 (breastplate) and a Shield +3. Inside the second chest is a Weapon, +3 (kopis), Sword of Sharpness (makhaira).
W8: Pit of Death#
This pit descends a mile into darkness before opening up into the roof of the Nether Sea and an island where two thrones stand. On this island is either the Lord of Ghosts
or Goloron. If the heroes descend down the pit to the island below, read the following:
Lord of Ghosts. If the Lord of Ghosts is here, read the following:
The Lord of Ghosts (Hyperion, appendix B), sits alone. As the heroes approach, his lips curl into a thin smile and a soft, uneven chuckle escapes him, his laughter echoing across the still waters. Despite his madness, or perhaps because of it, he is eager to speak.
He greets the heroes with cryptic warmth, claiming to have read their fate in the bones. It is not his siblings who will ascend, but the heroes themselves. He says he has shared this vision with the other hyperions, but they dismissed it as madness.
The Lord of Ghosts offers to reveal what he knows, speaking of the other hyperions and the truths behind their power. Refer to the Hyperions section in appendix A for the information he can share.
Once he has finished sharing, the Lord of Ghosts slowly rises from his throne and tears run down this face. He then attacks the heroes without warning. Unlike his fellow hyperions, the Lord of Ghosts will not teleport to the Apokalypsis Stone (area W21) when Bloodied. He will fight to the death.
Goloron. If it is Goloron (Hyperion, appendix B) on the island, read the following instead:
If the heroes attack Goloron, he summons one Nuckle (appendix B) for each hero from the inky black waters of the Nether Sea. He then teleports away, but not to the Apokalypsis Stone (area W21). His mother has revealed her intentions and does not want him present when she activates the Apokalypsis Stone.
If the heroes don’t attack, Goloron will speak with them.
If the heroes try to make sense of his words, they may question him, and he will answer.
His mother’s plan centers on the Apokalypsis Stone. To awaken it, she must sacrifice the hyperions including his other siblings. If the heroes wish to stop her, they must ignore the others and focus their strength on Lutheria herself.
If either Hergeron or Yala is still live, Goloron asks that they be spared. He insists they are not as lost to evil as he or his parents, and that the heroes might yet turn them into allies against Lutheria if they knew what she intended for them. Once the heroes have finished their questions, he teleports away.
W9: Planar Window#
The doors to this room are adamantine and are locked. Only Lutheria has the key. It requires a DC 25 Dexterity check using Thieves’ Tools to open the doors.
This is an artifact called a Planar Window. It looks into the dead world known as the Lost Lands. This world is inhabited by creatures known as Yoten. They hunger to bring ruin to new worlds and Lutheria has promised them such an opportunity.
Someone attuned to the window can use it as a two-way gateway to the Lost Lands. They can use it once every 24 hours. Lutheria is currently attuned to the mirror. Guarding this room are five Gigantes and two Gigantes
- Witches (both in appendix B) that hide behind the columns. They will attack anyone who enters the chamber.
Someone gazing through the window can make out movement in the distance. A successful DC 20 Wisdom (Perception) check will reveal one of the following scenes. Roll 1d4 to randomly determine the scene.
- Scene 1:
- Scene 2:
- Scene 3:
- Scene 4:
W10: Mortals Hall#
Within the chamber are five Satyrs, five Dryads, three humans and three elves (CN Nobles). They will be shocked by the presence of intruders. Conversations cease. A dryad’s flower wreath dims slightly, and a satyr lowers his goblet mid-sip. One of the humans, the eldest, steps forward, calm but alert. “You do not belong here.”
These mortals are fanatically loyal to the hyperions and if the heroes reveal that they are enemies, they will attack. The heroes should be able to make short work of them, but if they would rather defuse the situation without violence, then a successful DC 15 Charisma (Deception or Persuasion) will achieve that.
W11: Kitchen#
There are four human Nobles and two Satyrs working in the kitchen. They are terrified of intruders and offer to cook them any dish that they want. They are amazing chefs, and it only takes them 10 minutes to complete the meal. Anyone who partakes of the meal gains the benefits of a Short Rest.
W12: Pleasure Chambers#
This is where the Hyperions come to play. The Moon Maiden (Young Hyperion, appendix B) and Vile Trickster (Young Hyperion) are distracted and easily surprised by intruders. Vania’s laughter comes in waves, as if she is chasing a feeling she half remembers, while the Trickster murmurs seemingly unrelated truths between kisses.
Four Keledones (appendix B) provide music and will come to the aid of the hyperions if they are attacked. If one of the hyperions is killed, the other will flee to Lutheria at the Apokalypsis Stone (area W21).
W13: Servant’s Quarters#
- Naiad and Oceanid Nymphs (both in appendix B, The Great Labors), Satyrs, and other attendants who serve the Hyperions reside here. They rarely speak of their masters and avoid interacting with intruders. There are 1d4 of each here at any given time. A successful DC 15 Persuasion (Charisma) check can convince one of them to tell what they know. They know which of the hyperions are currently in the palace. They also fear that Lutheria has tricked these fledgling gods. She has promised to cast a mighty spell that will turn them into true gods, but Lutheria is not known for keeping her promises.
W14: Lutheria’s Chambers#
The two wall sized paintings are of Lutheria and Sydon. If Sydon is dead, then the painting has tears on Lutheria’s cheeks. If Sydon helped the heroes against her and the hyperions, then large holes have been ripped in the canvas of Sydon.
Lutheria uses these chambers for audiences with her mortal followers. Currently no one is in the chambers.
Behind the painting of Lutheria is a secret door. Someone looking behind the painting can find it with a successful DC 16 Wisdom (Perception) check. It is a 15-foot-high stone door that slides on railings. It leads to area W15.
W15: Draikana’s Chamber of Masks#
This is the lair of the Draikana (appendix B). This creature of chaos was met by Lutheria in the Grey Wastes after the Battle of Mytros. There, as she wandered among the forsaken, this entity took interest in her madness and broken divinity. It led her to the ruined world of the Yoten and showed her the Apokalypsis Stone (appendix C).
When the heroes enter, the chamber appears empty. The entity is not physically present, but it watches through the masks. A moment after the heroes enter the room, one by one the masks begin to whisper, their voices rising in a chorus. Then they go silent and one voice, male and tinged with lunacy, speaks clearly.
If the heroes lie to the draikana, it will call them out and say that it has no time for liars. It then tells them to try telling it the truth. If they still don’t divulge the truth, the masks will become silent. The draikana will then Plane Shift into the room and attack.
If the heroes do tell the truth, then the draikana will say the following:
If at least one hero accepts her offer, the draikana produces a set of five astragaloi, each a different color: red, blue, white, black, and green. An astragalos is a small, four-sided knucklebone, worn smooth by handling and traditionally cast to reveal the will of fate.
She instructs the heroes who accepted her offer to choose one astragalos to represent them. If more than five heroes wish to participate, the draikana allows only the youngest five to choose.
Once the astragaloi have been claimed, she directs the heroes to cast them in a strict order determined by color: red, blue, white, black, then green.
When a hero casts their astragalos, consult the Astragalos Results table to determine the symbol revealed. Each symbol corresponds to a card from the magic item The Deck of Many Things, and the card’s effect takes place immediately.
If any hero refuses to cast their astragalos, the draikana flies into a rage and attacks at once. If this occurs, any remaining astragaloi crumble to dust and their magic is lost. If all the heroes cast their astragaloi, then once the final fate is revealed, the draikana throws back her head in laughter and melts into a reeking pile of filth.
W16: Hyperion Chambers#
Several of the Hyperions (appendix B) have their own luxurious bedroom. However, the Sky Father prefers the mountainside, the Lord of Ghosts rarely leaves the Pit of Death, and the Fish Queen prefers the garden pool. The other five have rooms in the tower with the uppermost room reserved for the Sun Goddess or Yala.
W16a: Chamber of the Sun Goddess#
This room is occupied by either the Sun Goddess or Yala. If it is the Sun Goddess, read the following:
If it is Yala, read the following:
The Sun Goddess or Yala (Hyperion, appendix B) will attack and fight until Bloodied, then she will teleport to the Apokalypsis Stone (area W21) to join Lutheria.
W16b: Chamber of the Great Hunter#
If both the Great Hunter and Talieus are dead, this chamber is empty. If one still lives, he can be found resting on
the bed. When intruders enter, he immediately rises and attacks. Once Bloodied, he teleports to the Apokalypsis Stone (area W21) to join Lutheria.
There is a secret compartment beneath the bed. The Hunter lifts the bed on its side to gain access. If someone searching the room makes a successful DC 20 Intelligence (Investigate) check, they will notice the hand prints and drag marks that reveal how to gain access.
The compartment has a Symbol (Death) protecting it. Inside the compartment are a Quiver of Ehlonna and Bracers of Archery.
W16c: Chamber of the Moon Maiden#
The name the Moon Maiden bore as a mortal, Vania, is etched into the walls of this chamber in delicate silver script.
Treasure. The silk sheet that glitters with stars is a Robe of Stars.
W16d: Chamber of the Fire King#
Written with the carvings is a script that recounts how Kraggor shattered and reforged his own limbs in the forge, each self-inflicted break trading away a memory in exchange for a new design, a new perfection.
W16e: Chamber of the Vile Trickster#
The Vile Trickster likes to remind himself of the character of each of his fellow hyperions. A hero that makes a successful DC 18 Intelligence (Arcana) check is able to

trigger the illusion magic to show text on the walls that describe the Trickster’s opinion of each of the other hyperions. It is written in a long dead language and can only be read with the use of the spell Comprehend Languages. If the heroes can decipher it, read the following:
Garden Locations#
W17: Garden of Dreaming Monsters#
Lutheria keeps these monsters, a Cerberus, Greater
- Chimera (both in appendix B) and Behir asleep through ancient magic. She does not dream herself, so she walks their dreams instead. In those vast, chaotic inner worlds, she plucks warped fantasies and half-formed memories. She weaves them into curses or horrors that she casts upon the minds of mortals for amusement. A successful DC 18 Arcana or Religion check reveals
that powerful enchantment magic keeps the monsters in a suspended dream-state.
The monsters will not stir unless directly harmed. If any one of them is disturbed or injured, they all awaken and immediately attack.
W18: Vineyards#
Either the Sky Father or Chalcia can be found here. If it is the Sky Father, read the following:
If it is Chalcia present in the vineyards, read the following:
The Sky Father (Hyperion, appendix B) is enraged by any interruption and immediately charges into combat as his Naiads (appendix B, The Great Labors) cheer him on. He fights to the death. Chalcia (Hyperion, appendix B) also attacks, but once Bloodied, she teleports to the Apokalypsis Stone (area W21).
W19: The Paths#
These gardens are more beautiful than any in Thylea. Birds and beasts of all kinds can be found in the gardens. When the heroes enter one of the clearings within the paths, roll on the Random Beasts table to see what they encounter.
W20: Hyperion Pool#
This pool is the size of a small lake and fills half the mountaintop. The sides are mother-of-pearl, and the water descends to a depth of 100 feet.
This area is occupied by either the Fish Queen or Hergeron. If it is the Fish Queen, read:
If it is Hergeron, read:
The Fish Queen (Young Hyperion, appendix B) commands the creatures of the pool. If attacked, she retreats into the depths and directs her Ichthys (appendix B) and guardian Serpens (appendix B) to deal with intruders. She fights until Bloodied, then teleports to the Apokalypsis Stone (area W21).
Hergeron (Young Hyperion, appendix B) attacks immediately. Once Bloodied, he teleports to the Apokalypsis Stone (area W21).
Serpens. This eel-like sea serpent serves as the Fish Queen’s guardian and remains within 30 feet of her unless responding to intruders in the connecting tunnel (area W5).
Ichthys. These cursed creatures skulk along the lake floor, seeking to prove their loyalty. Four are present.
W21: Apokalypsis Stone#
If Lutheria has not summoned the empyreans to the Apokalypsis Stone, then read the following:
The Apokalypsis Stone is indestructible and can only be moved by someone who is attuned to it. Currently, Lutheria is attuned to the stone.
Confronting Lutheria#
Once the heroes have defeated three of the hyperions, Lutheria will teleport to the Apokalypsis Stone and then summon the remaining Hyperions to her side. If this happens, read the following instead:
The stone orb is the Apokalypsis Stone (appendix C). It has the power to open a rift to a dead world where a race of giants known as the Yoten dwell. They have already destroyed one world and would be eager to destroy another.
All of the remaining hyperions will be gathered here with Lutheria when the heroes arrive. The hyperions fight to the death, since they are supremely confident of victory. However, they are not true gods yet; they are still waiting for Lutheria to fulfill a sacred oath that she swore to them.
Lutheria’s Oath#
In anticipation of this battle, Lutheria swore an oath to use the Theogenesis spell to transform the Hyperions into true gods. However, this is a lie. She needs their life force to power the Apokalypsis Stone. She has been able to use the stone to open a portal for a limited time, but she needs the life force of the powerful hyperions to make it permanent.
As the battle turns against the Hyperions, they shout out to Lutheria to cast the spell and fulfill her part of the oath. But even as they grow desperate, she refuses to comply. The Hyperions placed their faith in the goddess of death. And like all things that trust her, they were betrayed.
Lutheria’s Final Joke#
Lutheria set the Apokalypsis in motion and convinced the Hyperions to take advantage of the chaos, but she never truly intended to allow them to become gods. Her plan is much more sinister. She wants to open a permanent portal to the dead world of the Yoten, so that they may pour through and bring chaos and destruction in their wake.
The Apokalypsis Stone#
The stone becomes active after the first of the hyperions is killed. It begins to spin and a rift forms around it. On initiative count 20 on the round after the first Hyperion is killed, the first of the Yoten will emerge from the rift. It is a Blood Shadow (appendix B). On initiative count 20 of the following rounds there is a fifty percent chance that another blood shadow emerges.
The portal only becomes permanent after three of the hyperions have died. Otherwise, it closes after 1 minute.
Preventing Oblivion#
To make the portal permanent, Lutheria (appendix A) needs to collect the souls of three Hyperions. She watches the battle from the sidelines, laughing at the hyperions as they fall in combat. She does not attack the heroes; in fact, she cheers them on, and she may even join in the battle to help them. The only way to prevent Lutheria’s plan from succeeding is to spare some of the hyperions from death. After two of the hyperions have fallen, they will realize what is happening and will beg the heroes for mercy.
Final Resolution#
When the battle is finished, the Furies arrive and pronounce judgment on Lutheria: she has broken her oath to the Hyperions, violating the most fundamental rule of godhood. As she slowly dissolves away into nothingness, Lutheria laughs uncontrollably at the irony of it all. The surviving Hyperions swear eternal fealty to the heroes.